Thursday, December 1, 2016

Corrugated ribbing tricks and tips

Corrugated ribbing looks like a very fancy kind of ribbing and it's knitted like a fancy kind of ribbing, but doesn't act much like a ribbing at all.

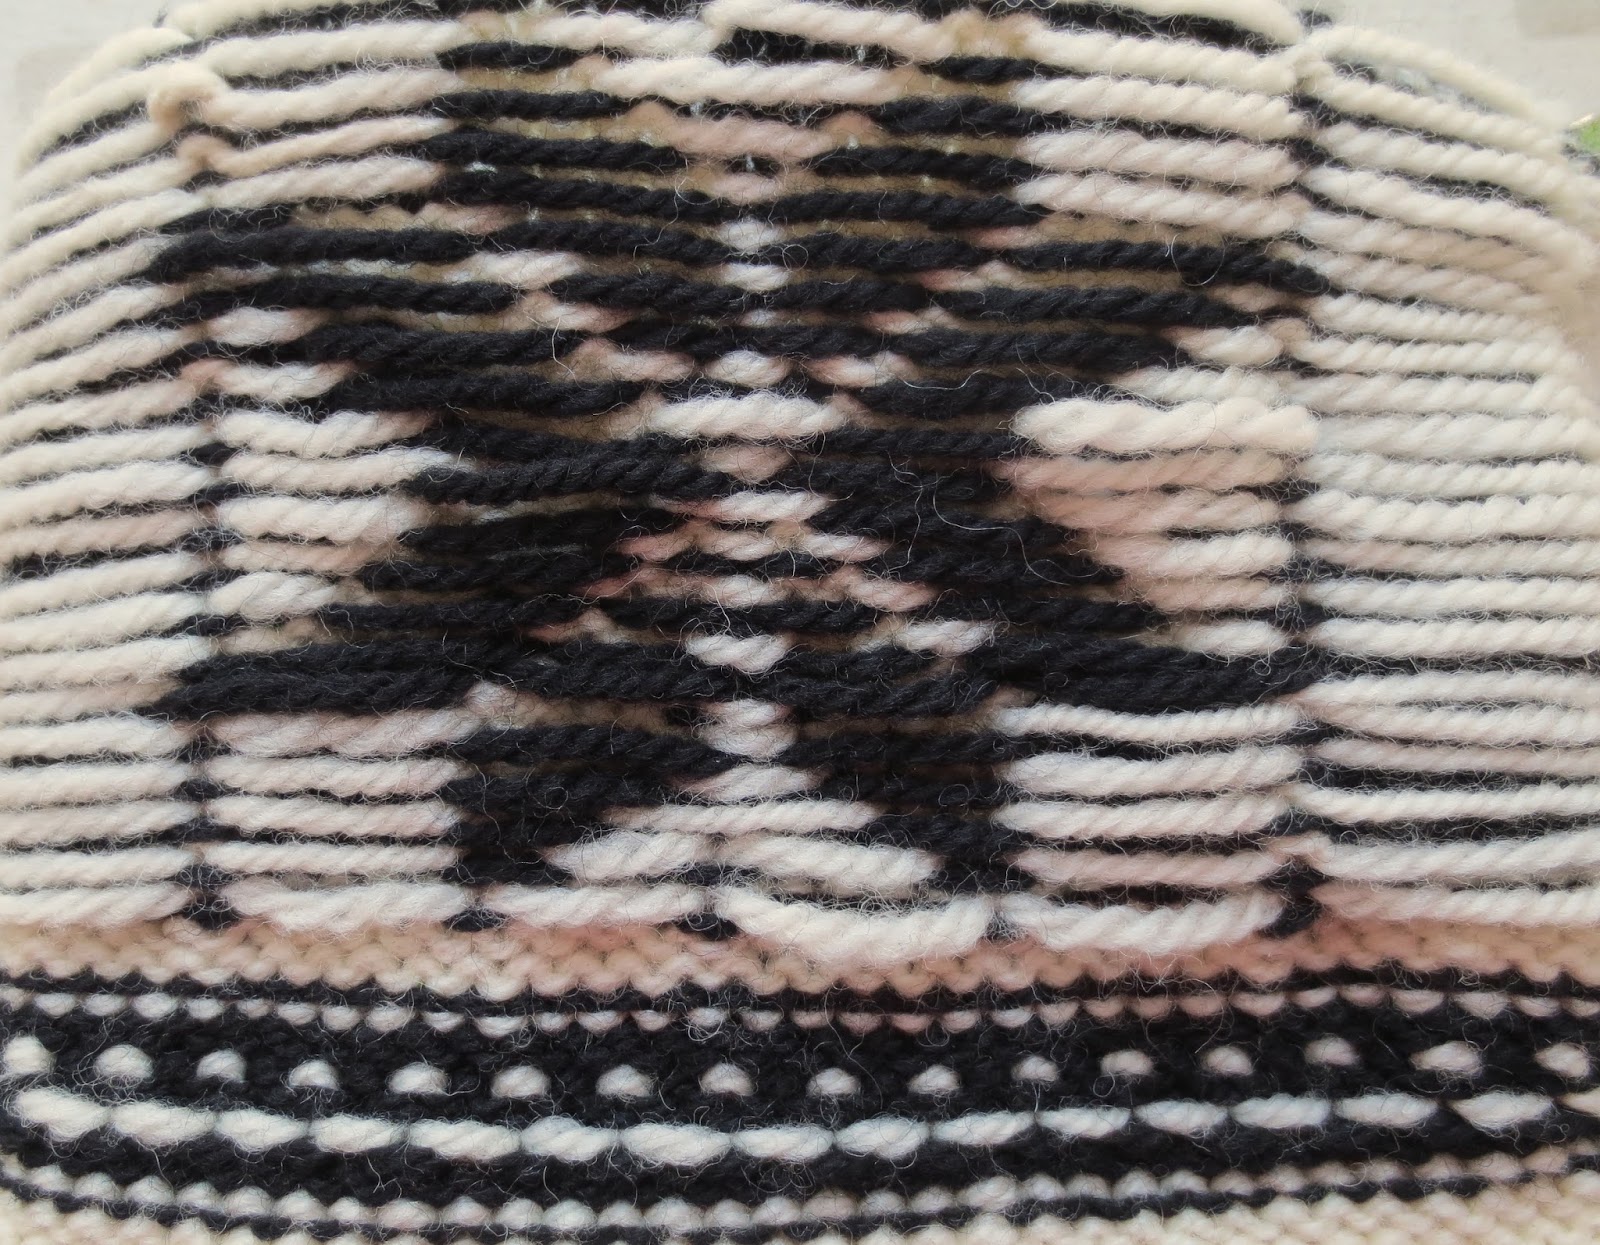
Front and back of a simple 2-color corrugated 1/1 ribbing. 15 columns are shown: 8 knits, 7 purls.

Admittedly gorgeous, corrugated ribbing is certainly traditional for certain kinds of Fair-Isle knitting. Yet, structurally speaking, corrugated ribbing is a rather poor choice at a garment edge.  It also has certain other peculiarities which can detract from its overall appearance.

Today's post starts out with a background on the problem, then turns to some tricks and tips you may find useful in designing or knitting with corrugated knitting.

The DIFFERENCE between CORRUGATED RIBBING and ORDINARY RIBBING

Ordinary ribbing, knit in the same yarn, and a far LOOSER gauge than above corrugated sample.  Like the opening photo, this close-up also shows a piece 15 columns wide: 8 knit and 7 (hidden on the back!) purl columns.  Note how much narrower this sample is than the previous--this is because ordinary ribbing such as this "draws in."
Ordinary ribbing is a highly three-dimensional fabric with a great deal of "reserve stretch" built into the fabric.  Corrugated ribbing is the opposite: non-stretchy, it does not "draw in."  Ordinary ribbing helps garments cling around cuffs and bottom-bands.  Corrugated ribbing does not cling at all. So, why is corrugated ribbing called "ribbing" at all?

Similarities: 
Structurally,  the basic idea behind corrugated ribbing is alternating columns of knits and purls, so in its manner of construction, corrugated ribbing does resemble ordinary ribbing.  Also similar to ordinary ribbing, corrugated ribbing can be worked in various arrangements of knit and purl columns: 1/1, 2/2, 2/1,* etc.

Differences:
However, although they are knit similarly, the two fabrics have very different types of structure, and this is because of color-knitting.  You see, ordinary ribbing is one-color knitting, but corrugated ribbing is a form of two-color knitting.

Two-color knitting requires the color not in use to be "carried" or "floated" across the fabric back.  It is all those floats back there which stop corrugated ribbing from stretching when pulled.  The upshot is that ordinary ribbing--well known as a stretchy fabric--becomes a firmer fabric when knit as two-color corrugated ribbing.

Although the two photos above show the ordinary ribbing to be narrower, this is true only when the two fabrics are at rest. The surprising fact is, the corrugated ribbing is actually the narrower fabric overall.  When stretched, ordinary ribbing can become MUCH wider than corrugated ribbing, despite the opposite being true when both fabrics are at rest. Again, this is due to the "reserve stretch" built into the ordinary ribbing, which is absent from the corrugated ribbing.

Another key structural difference between corrugated ribbing and ordinary ribbing is that ordinary ribbing is a non-curling fabric.  Recall that fabrics featuring a distribution of knit and purl stitches on each fabric face (so called "reversible" fabrics) do not curl. In fact, even if the distribution is as low as 75% one kind of stitch to 25% of the other kind, the fabric is essentially curl-free.  Ribbing meets this definition by its alternating columns of knits and purls, and even a 3/1 ribbing will not curl.  However, despite the fact that corrugated ribbing is worked up in alternating columns of knits and purls, adding the floats from two-color knitting into the mix upsets the reversible nature of the fabric.  In other words, the floats on the back unbalance the fabric.  Result?  Corrugated ribbing can curl and flip and get up to all the miserable little tricks that stockinette fabric does.

property ribbing corrugated ribbing
configuration:
possibility for 
different configurations (1/1, 2/1 etc)
advantage:
stretches, “draws in”

problems:
flips up, curls up

beauty of appearance:
2-color

Above is a chart summarizing the similarities and differences.  Below, I address the issues raised.

STRETCH and NUMBER of STITCHES to CAST ON

Because ribbing stretches and corrugated ribbing does not, you must knit corrugated ribbing to different rules than ordinary ribbing.

Specifically, ordinary ribbing is generally worked on fewer stitches than the main body of the garment, and using smaller needles.  By contrast, corrugated ribbing is generally worked on the same number of stitches as the main body of the garment, and using the same sized needles.  Failure to make this adjustment will result in tight, unpopular  sweater bands.

METHOD of CAST-ON

Problem 1:
Corrugated ribbing is quite firm.  Casting on for a firm fabric is quite the trick.  Too loose and you get flare, too tight and you get puckers. Plus, a tight cast-on--with the yarn held under constant stress--wears out oh so much faster than it should.  (I think wear-through from a too-tight cast-on/off probably spells the end to more high-use sweaters than any other problem, including outgrowing them or wearing out the elbows.)

Problem 2:
While ordinary ribbing does not flip or curl,  corrugated ribbing tends to. Sometimes, this leads to peek-out, where the back face of the fabric, with all its floats, peeks out at the bottom of that gorgeous Fair-Isle sweater you knit.

The solution I propose solves both problems by separating the edge of the fabric (where the structural problems lie) from the edge of the garment--where you want your corrugated ribbing to appear in all its glory. TECHknitting blog already features a whole post on separating the edge of the fabric from the edge of the garment, so I won't go into all that again here, but all boiled down, my advice is threefold:

  1. cast on in any manner you like, somewhat loosely.
  2. Knit several rounds (3-5, or even more, depending on taste) in stockinette.  This not only creates a sturdy rolled edge, but it also hides the cast on
  3. Above the rolled edge, knit two or three rounds in main color, working in the ribbing which corresponds to your proposed corrugated ribbing.  (1/1 ribbing if you'll be knitting 1/1 corrugated, 2/2 if 2/2, etc)

The result is, the corrugated ribbing--not well suited to be a fabric edge--gets bordered with a structurally correct edge: a garment-edge which can take wear, yet will not flip, flare or bind. Furthermore, this bottom edge is much shorter than the number of rows suggests, because the rolled edge curls up to hide the few rows of main-color ribbing.  The effect is to create a short textured frame in main color, laying just below the start of the corrugated ribbing. Here's another view of the opening photo with its rolled edge


Just as a picture frame does not hide the bottom of the painting, but rather, sets it off, so a frame of main color does not hide that the "visual bottom" of the garment is the corrugated ribbing itself. Also by this trick, the floats on the back are so far up and in from the garment edge, that they will never peek out from the bottom, either.  

If you do not care for the look of a rolled edge, you can achieve many of these aims by simply casting on and working a few rounds in main color ribbing before beginning the corrugated ribbing.  However, you then may find that the flip wants to occur at the border of the ribbing and the corrugated ribbing, so consider using the transition zone trick to help mitigate. Swatch first, of course.

WORKING PURLS AND KNITS IN TWO-COLOR KNITTING
Multiple pass knitting as an option

Corrugated ribbing resembles ordinary ribbing in this at least: it is created by working alternating columns of knits and purls.  Corrugated ribbing is also a form of two-color knitting, so you must control two separate yarns, applying each to the correct column. I believe two-color knitting goes fastest and works easiest when you hold one color in each hand.

However, even if you are perfectly at home knitting stockinette in two colors, you may find that alternating knits and purls with one color in each hand is not that much fun.  If so, I have a trick that will let you apply only one color at a time, making it much more feasible to work corrugated knitting in front of the TV, for example, or on your daily bus-commute. This trick is called "multiple-pass color knitting"

Multiple-pass knitting
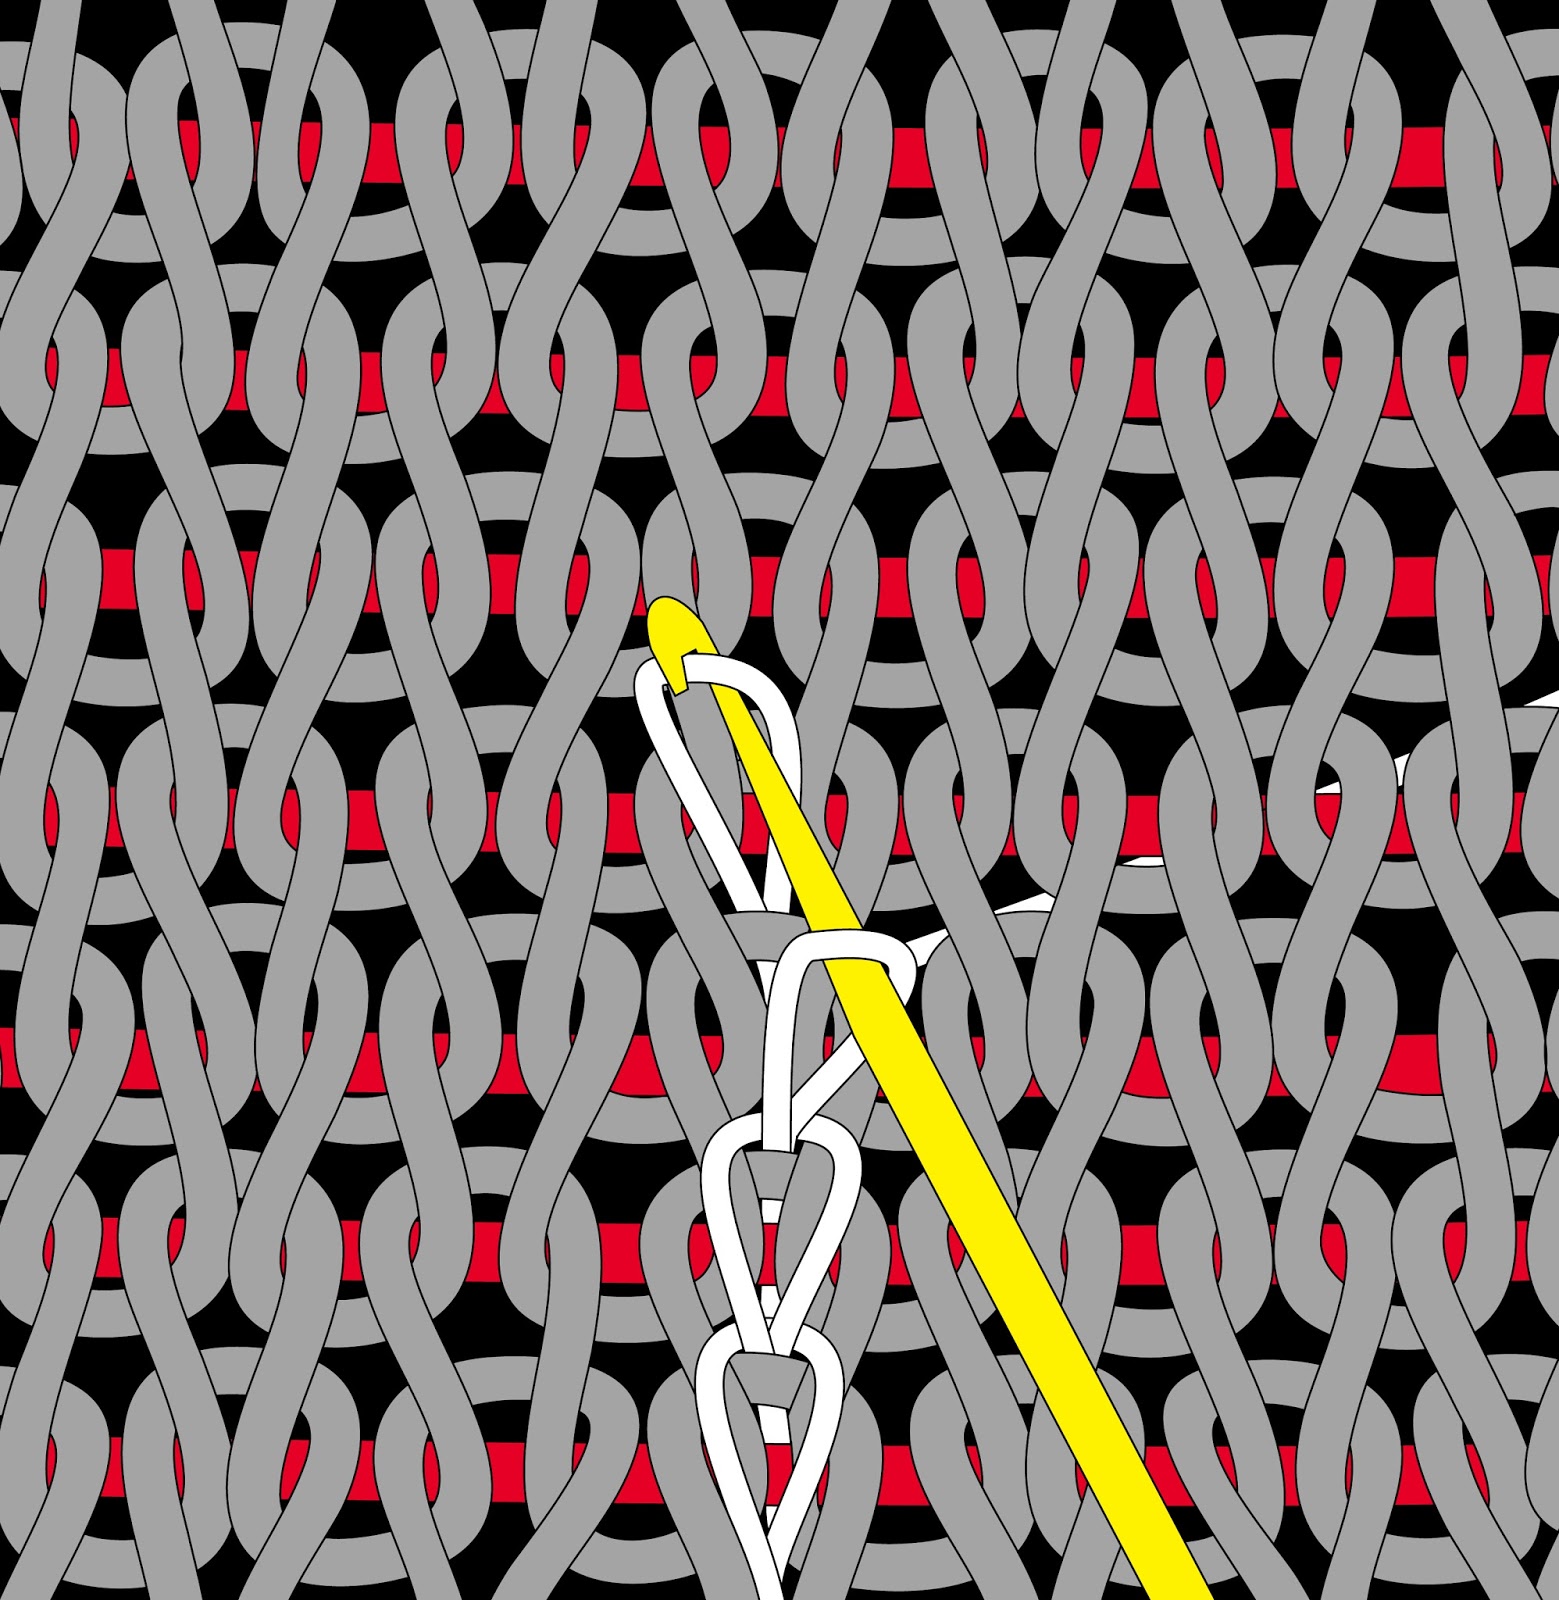
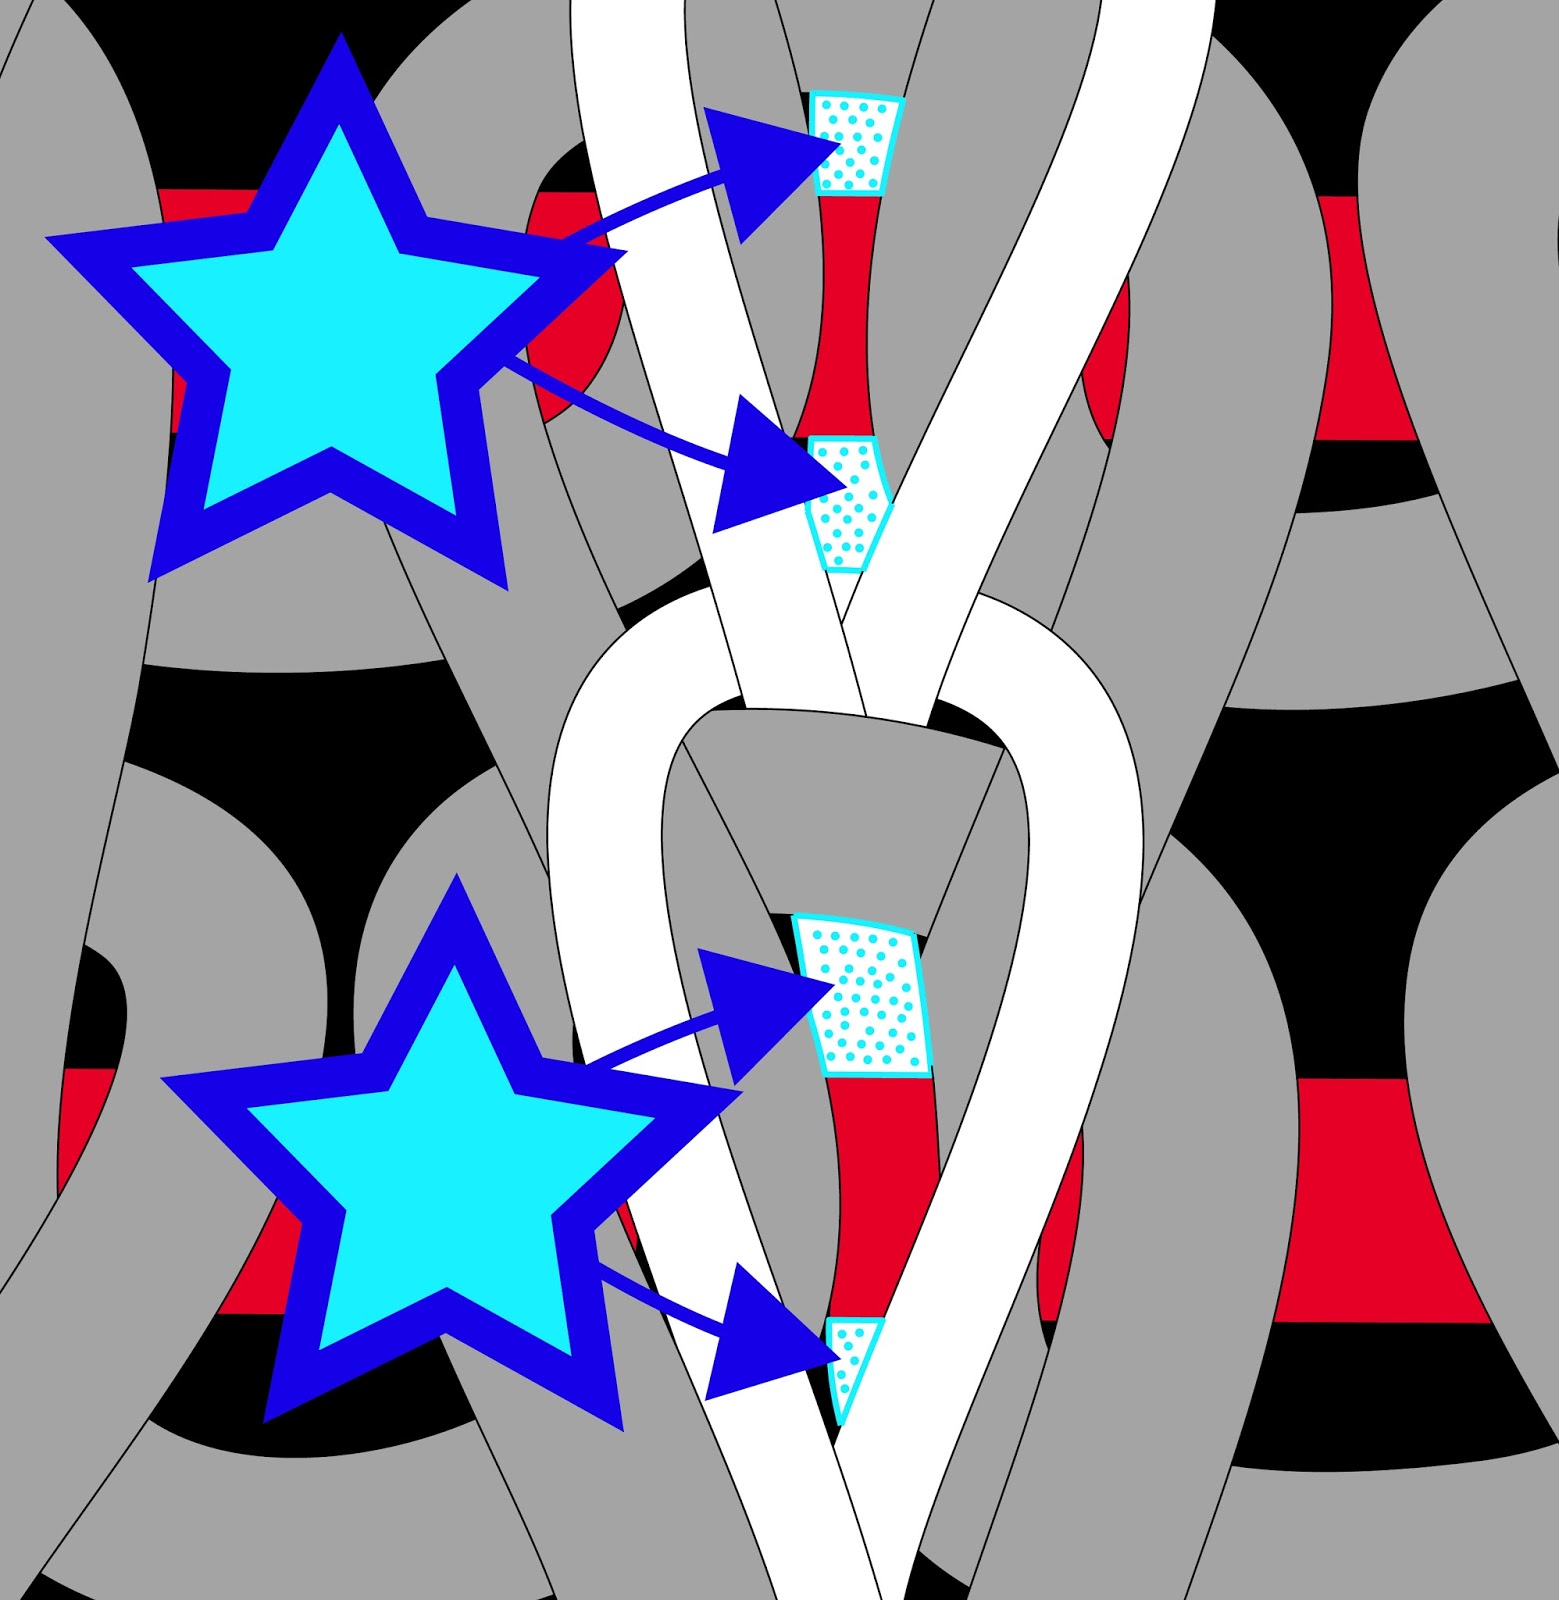
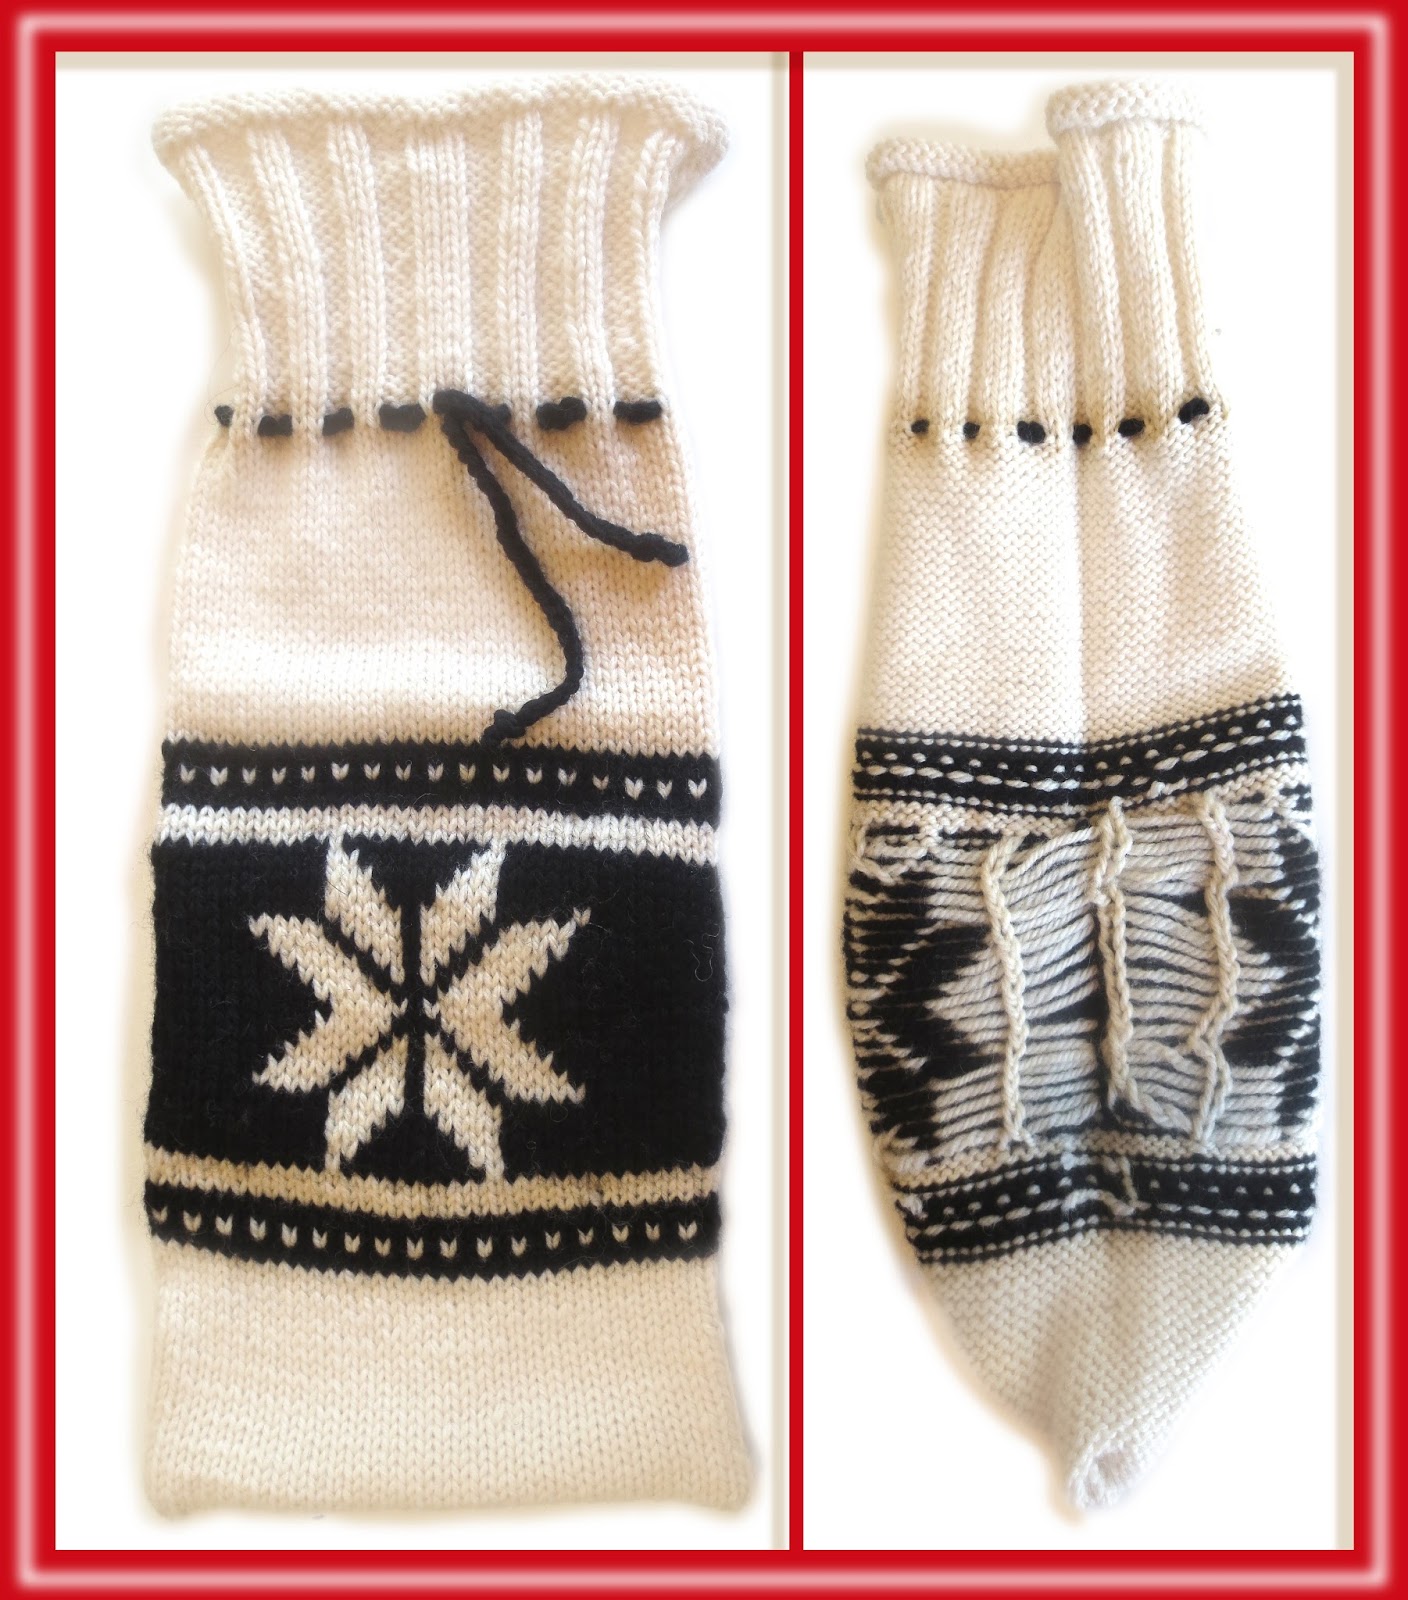
The link above takes you to a whole post about how to work multiple pass color knitting, so I won't repeat all that.  The short version is, you work one yarn at a time, IGNORING the stitches worked in the other color.  This requires you to go through each round TWICE, first working in one color, then the other. How you do this is, you slip out of your way the stitches you're ignoring, without operating upon them, and work only the stitches in the same color as your yarn.

Example: in a black garment with colorful corrugations, you might work the black yarn in the first pass, knitting or purling it as your pattern requires.  Each time you come to a non-black stitch, you hold the black yarn to the back, then simply slip the non-black stitch from the left (holding) needle to the right needle without changing the stitch orientation. In this manner you go around, working the black yarn until you finish the round.  Naturally, the round is only half-done, and you now go back for the second half of the round, working the other color yarn as required and slipping the black yarn.

Note that if you choose to do this trick, you should always work the same yarn first--in our example, the black one.  Otherwise, the fabric gets subtle but odd stripes where the "other yarn" broke pattern and went first. Also, don't stop at the half-way point: make it a rule for yourself that you have to do BOTH passes through the fabric before quitting for the night.

Note also that ALL color knitting can be done this way, not just corrugated ribbing, and that you're not limited to two colors: you can pass through as many times as you like, with as many colors as you want (although, of course, your fabric back will become very thick from all the floats).
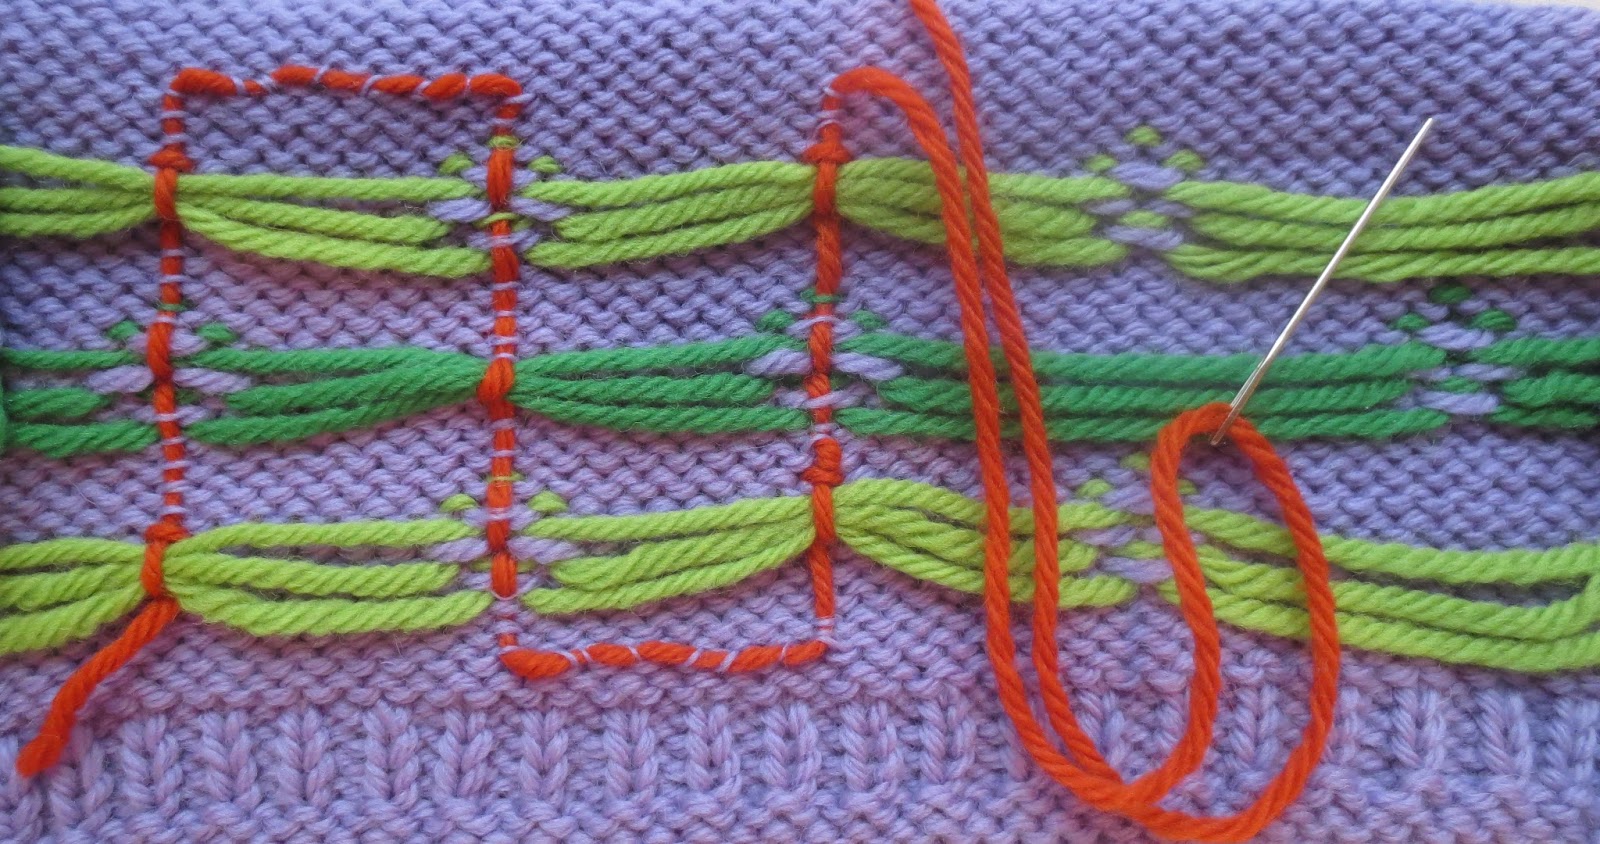

BLIPS ("ICKY DOTS")

Some people (myself among them) do not care for the look of the contrasting-color dot which occurs when purling in the first row of a color change.  I have called these blips "icky dots," and wrote a whole blog post about how to avoid them. However, tastes differ,  and in all things, it is "knitter's choice."  (And, even I must admit that sometimesblips can be a beautiful design element**)

Below is a corrugated ribbing knit with a color change in every row, where the corrugations appear in the colorful columns.  Specifically, the ribbing is 1/1, the color changes are worked every row, the colored columns are the purled ones, while the black columns are the knit ones.  Have a look and you will see what I mean by "blips" (icky dots).

"Blipped" ("icky dot") corrugated, where every row in the colorful columns is worked as a different color, as a purled stitch

To my eyes, working every colorful row as a purl stitch in corrugated ribbing, as in the above examples, makes for a rather muddy transition.  Yet, I must admit that I've knit a sort of worst-case scenario.  For one thing, the colors transitioning here contain strong contrasts. Colors more closely related would look better blipped together like this.  Also, if there were more than one row of each color, the transitions would be a lower proportion of the overall work, which would mitigate the effect somewhat. Swatch, swatch, swatch, and see for yourself how YOU like the blips arising from purling every colorful row in a corrugated ribbing.

If you decide you don't mind the blips, no need to read further in today's post.  However, if you wish to AVOID blips, then read on--below are three tricks to do so.

__________

Recall that the whole problem with contrasting color blips (icky dots) is caused when purling in a new row of a color change.  The act of purling drags up into the current row, the "head" of the stitch in the row below.  These little stitch-heads positioned next to one another along the row are the "icky dots."  Therefore, one cure is to avoid purling on the first row of a color change.  There are three ways of effecting this, each considered below.

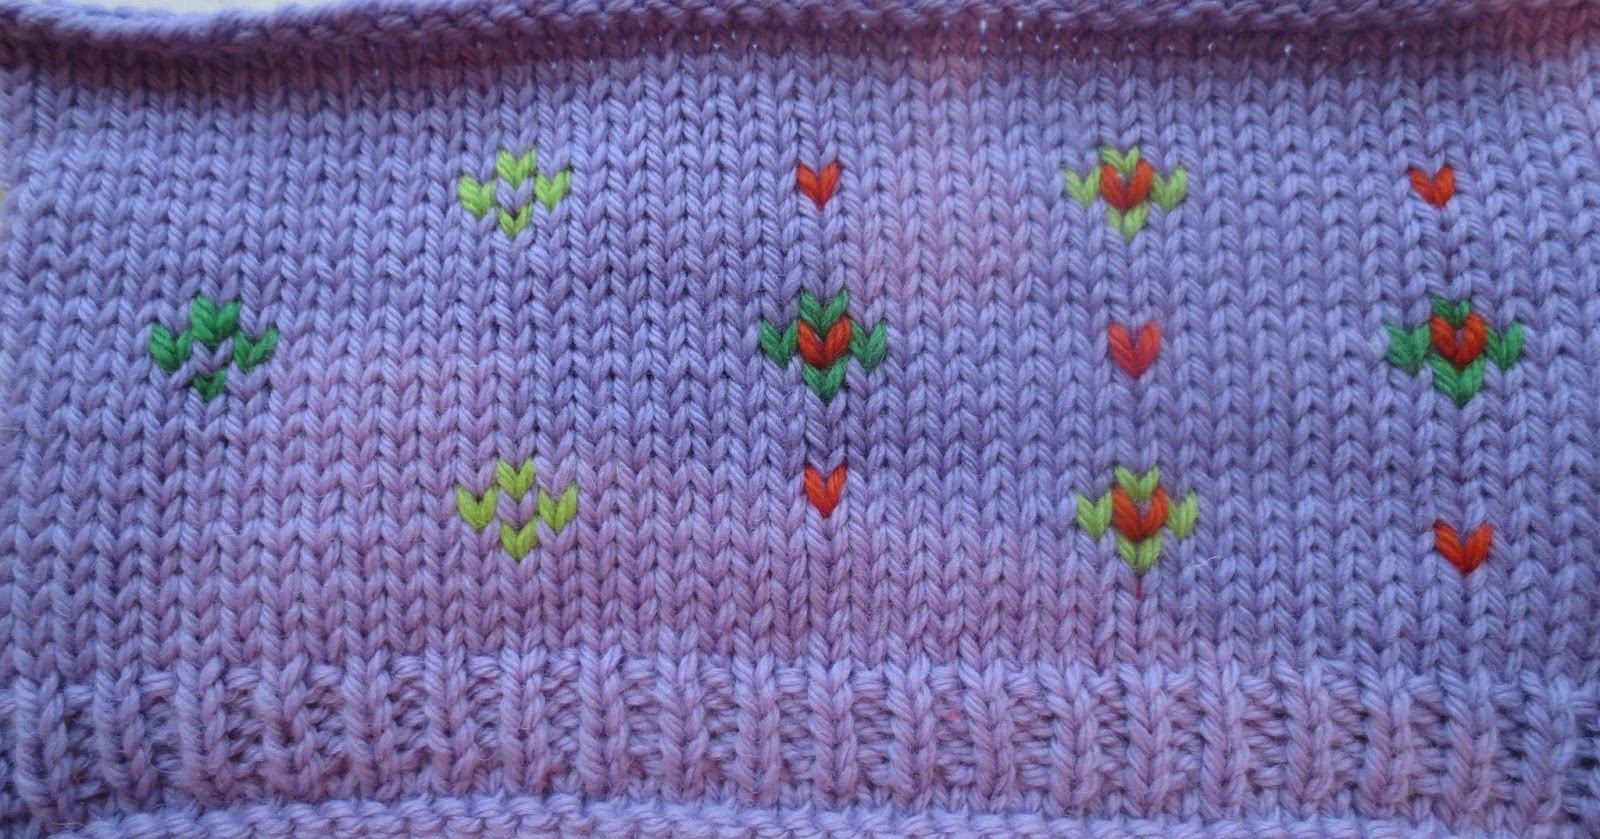
Trick #1: Work the purl columns in the main color, instead of in the contrast color. 
If you reverse the usual order of the corrugations by working the "purl columns" in the main color, and the color-change columns in knit stitches, the purl stitches are always in the SAME color (the main color) so there is no opportunity for blip-formation.  Meanwhile, the color-change columns are in knit stitches, which do not form blips. Therefore, you can change the colors in the color-change columns as often as every single row, if you like, and there will never be a problem with blips.  This was done in the opening photo (first photo of post).  Below is an additional example.

The black columns (main color columns) separating the colorful columns are worked in purl, and in this way, the over all "corrugated" texture is preserved, yet the colorful columns, being knit, show no "blips" ("icky dots").  Compare this photo to the previous.
For a further example of corrugation in the main color columns, here is a link to a beautifully-knit corrugated 2/2 ribbing with frequent color changes, where the knitter worked the main color (black) as the purl stitches, and the colored stitches as the knit ones. BTW? the linked picture comes from Feral Knitter's blog whose post about corrugated ribbing shows some other lovely experiments in this same mode. (She's got a book about Fair Isle knitting out too.)

Trick #2: When working in two colors only
If you knit corrugated ribbing in two colors only--one main color, and one contrasting color AND if the corrugations (purls) are in the contrasting color columns, then the blips would only show at the top and bottom of the contrasting color columns, as shown in this linked sample. The cure is simple: in the first of the corrugation-rows and the first row of the knitting ABOVE the end of the corrugation-columns, work every stitch so it appears as a knit stitch on the front fabric face. No purling, no blip.

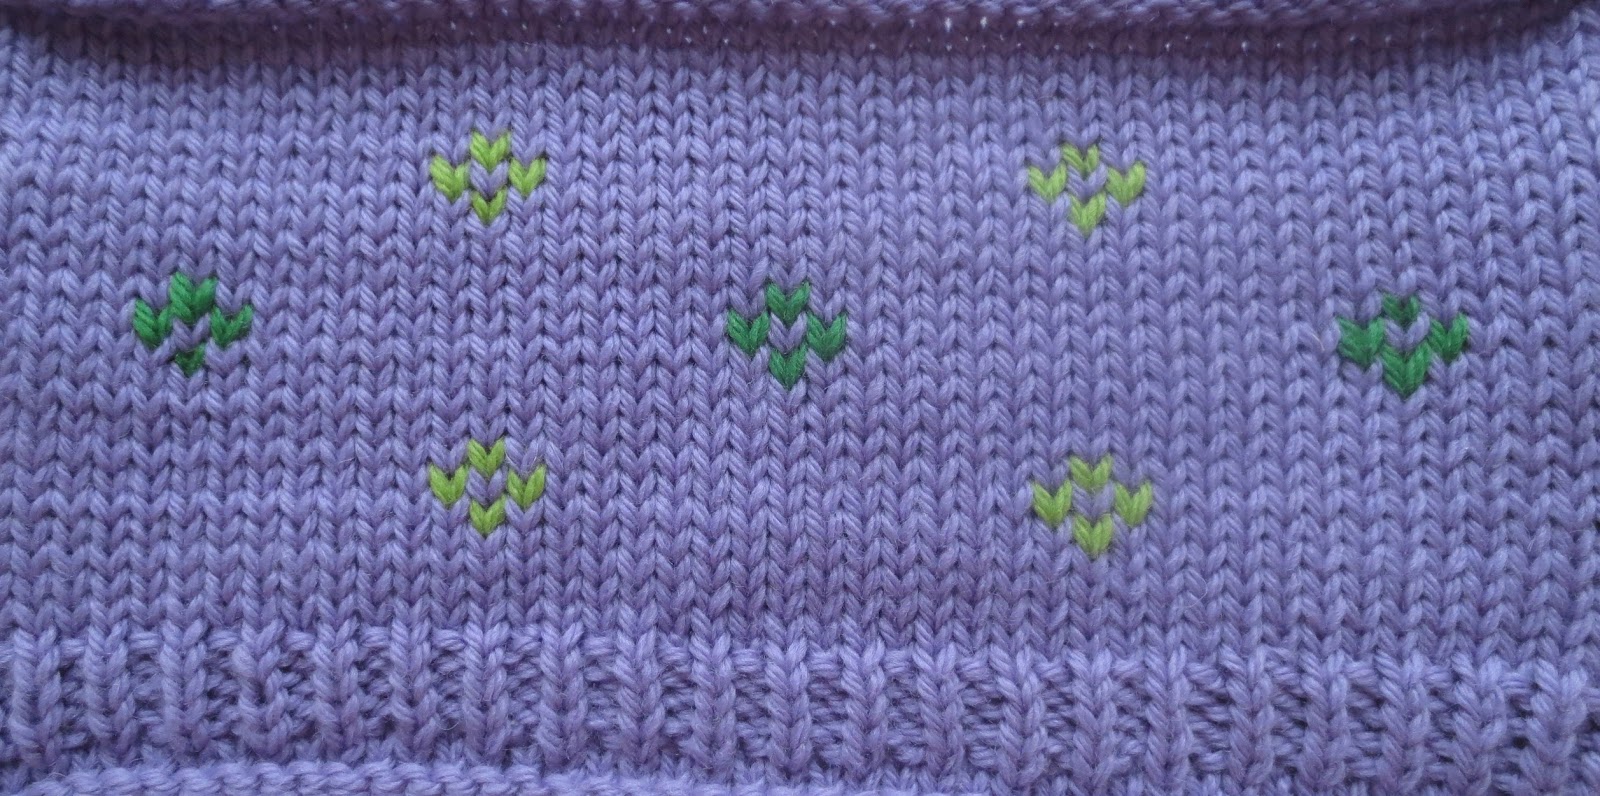
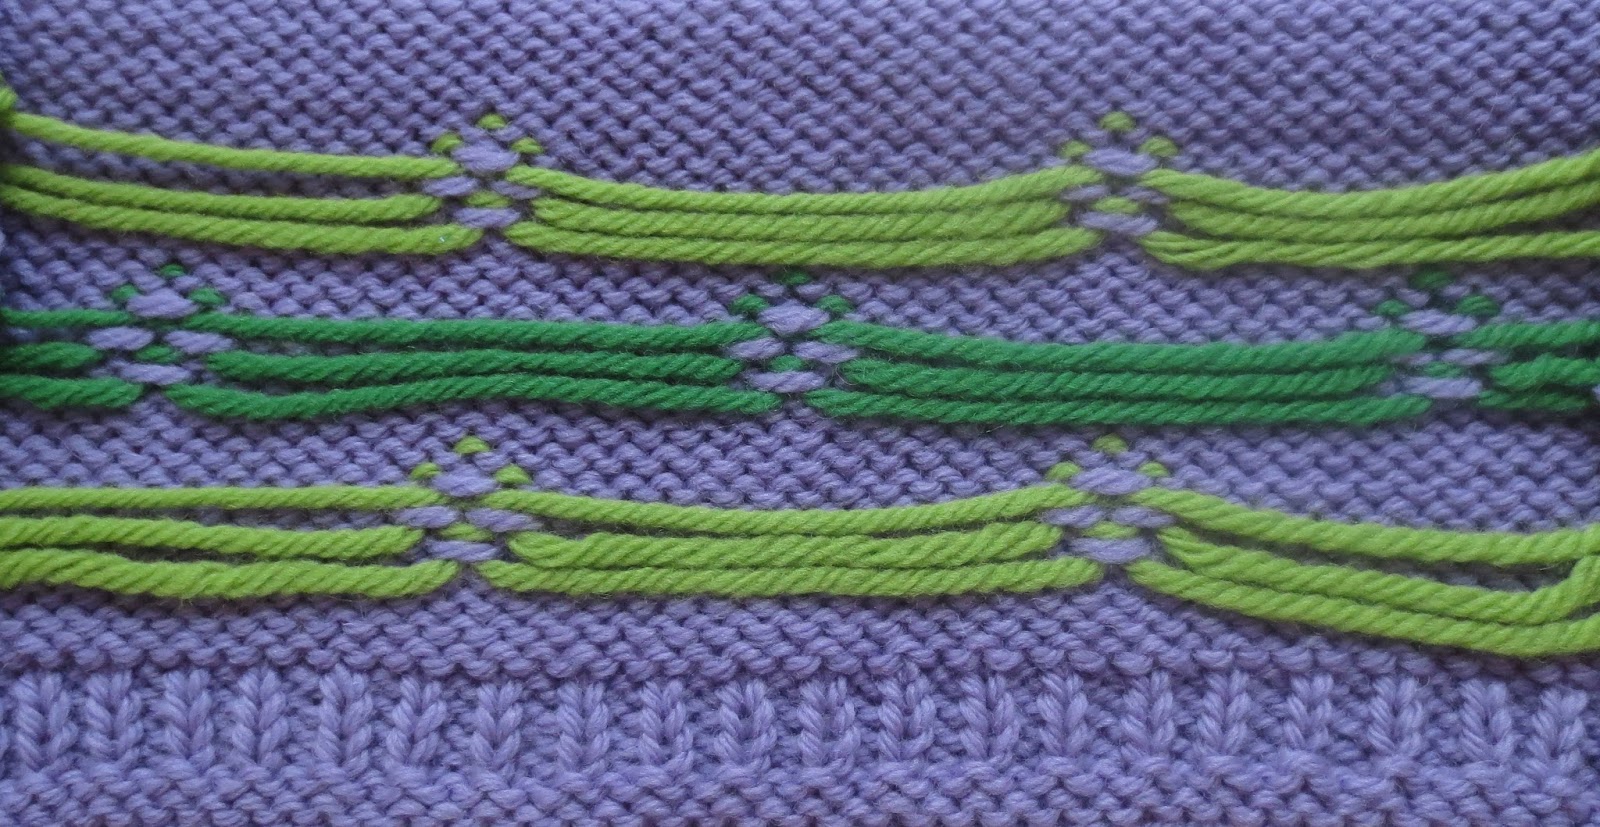
Trick #3: Two rounds high (my favorite trick)
If you want to work in many colors with the corrugations in the colored columns, but want to avoid the blip, use this trick: work the purl columns so that each color is two rounds high, the first round knit, the second purled.  In this way, when the act of purling pulls the head of the underlying stitch into the current row, it makes no blip because the underlying row is the same color. Stated otherwise, make each "row" of corrugated color actually TWO rounds high, knitting the first round and purling the second round. Below are two examples--compare these to the "blipped" corrugated shown earlier, and also to the sample where the corrugations are in the main-color columns. 

Two examples of 2-row-high "blipless" corrugated, worked as described in the text.  Note also the rolled edge evident on the white sample.

This 2-round high trick is my favorite, and I use it almost exclusively when knitting multiple colors in corrugated ribbing.  This is partly because I think the corrugations look more impressive when worked in the colors, rather than the main color; partly because I like the "centered" look when each color is worked 2-rounds high with a little texture dot right in the middle of each little color-square; and partly because I am lazy. 

You see, this two-row-high trick makes working corrugated knitting easier, because the net effect is to reduce purling to a mere 25% of your total fabric. Also, if you were working the multiple pass knitting method mentioned above in a bid to avoid two-color purling, you'd only have to slip once out of every two rounds, instead of every round. This 75%-25% ratio would also make this the easiest modification of corrugated ribbing to knit flat (back and forth).

Have fun with this--
--TK


Addendum, Dec 22 2016: Juliane L. wrote me via Hotmail (address in R sidebar) to say the following:

Here's something you made me realize: with multipass knitting for corrugated rib in the round, you don't need to purl ever. Just do the knit-color round as normal, and the purl-color round in the other direction, looking at the inside, and slipping with yarn in front.

The knit stitch, yarn in front alternation still makes you switch the yarn from front to back, so this is probably useless for yarn-in-the-right knitters, but for continental, it works great. I do rounds on two circs, and there you only have to pick up a new needle as often as for one single-pass round, not as for two: at the end of the knit-color round, just turn the needle to begin the purl-color round and vice versa.

Only trouble is to keep the yarn from the resting ball from getting trapped where it shouldn't while changing needles.

Thank you for writing, Jule, this is a wonderful idea.  It made me slap my head and say "of course!"  Best regards, TK
____________________________ 

*1/1, 2/2 and similar notation is a shorthand for describing ribbing, and here is the key. Assuming you are working in circular knitting...
  • 1/1= on an even number of stitches, k1, p1 every round 
  • 2/2 = on a multiple of 4 stitches, k2, p2 every round 
  • 2/1= on a multiple of three stitches, k2, p1 every round
and so on...

____________________________

** The linked photo is to a sweater knit in "bohus" style, which cleverly uses purl blips to set off the gorgeous color designs. 

Wednesday, November 23, 2016

Fastening long floats for invisible stranding--alternatives to the STUART ladderback

Invisible stranding in color knitting via ladderbacks has been the topic of several previous TECHknitting posts.


Today's post goes beyond STUART. You see, STUART offers two advantages. 1) It's a method for regulating your tension on long floats as you are knitting, and 2) it is also a method for fastening down the long floats after the knitting is done.  But, if you are an expert knitter (or just a bold one) you could simply knit super-long floats without any tension-regulation help from STUART, and then tack down your super-long floats afterward, as part of the finishing process.

In short, today's post is useful if you are skilled enough--or bold enough--to simply knit giant long floats without STUART's help in regulating the float tension. The point is, today's post does not talk about how to KNIT those floats--it simply shows you three methods for TACKING DOWN those long floats as part of the finishing process.


Alternative #1:  FREE-FORM PINSTRIPE-TACKING
(column-in-a-column, similar to the quilter's trick of "stitch in the ditch")
In combining pinstriping with STUART,  the previous post showed the catchment column re-hooked as a PURL column, and then a pinstripe was worked up this purl column to tack the long float in place, row-by-row.

However, It is actually possible to work a "free-form pinstripe" right up the middle of a KNIT column, and use that to catch the floats on every row.  In other words, despite the fact that pinstripes are ordinarily worked into a purl column, a purl column is not actually required to work a pinstripe.  Instead, you can work a pinstripe in a different way--worked right through an knit column--and tack long floats in that manner.Working a pinstripe through a knit column is called a "free-form pinstripe." A free-form pinstripe is the knitter's analog to the quilter's trick of "stitch in the ditch."

The upside is, if you are bold enough to knit long floats, then free-form pinstripes offer a way of permanently tacking these down after the fact. However, the downside is, free-form pinstriping makes a "column-in-a-column" which is visible on the fabric surface.

Here is a diagram of what is going on.


free-form pinstriping in action

Here's a close-up of what's going on:


close-up of free-form pinstripes

The blue stars point at the blue-dotted stretches: these are the running yarn behind the slip stitches.  It is these running yarns which hold the floats (red) against the back surface of the fabric. Naturally, the slip stitches and the background stitches would be the same color in real life (as shown on the photo below).  I just drew the slip stitches white and the background stitches gray so you could see what is going on.

Below is a photo of this process in real life.


Column-in-a-column free-form pinstriping, in real life.  The blue colorization highlights the left arms of the original stitch, the green highlights the right arms and the red highlights the free-form pinstripe

You can see the white free-form pinstripe forming a column-in-a-column on the fabric surface. In other words,  the original knit column is split in half by the pinstripe.  The result is that the left arm of the original column (colorized blue) frames the centered free-form pinstripe (colorized red) while the right arm of the original column (colorized green) frames the right side of the free-form pinstripe. I only colorized two rows for you. The bottom part of the photo shows the free-form pinstripe in its un-colorized state, and you can see this is fairly subtle, even on this extreme closeup.

Here's what this looks like on the back. The white free-form pinstripe tacks the long floats (black) to the back surface of the fabric on every row.


The white column-in-a-column free-form pinstripe, as seen from the back, used to tack down long black floats 

Are you concerned that this column-in-a-column free-form pinstripe will show or be bulky?  I'm not going to lie, the answer is YES--you can both see and feel the free-form pinstripe.  In fact, if you use this trick, then as the knitter who made the thing, you will never be able UN-see it!

However, this does not mean others will see it. See, you have to convince yourself, just like magicians do, that despite how obvious this trick is to you, it is invisible to others.

"Magic tricks" work because under normal conditions, we humans only SEE what we are LOOKING for.  This trick doesn't disturb the fabric so much that it draws attention to itself: only two out of 10 knitters in a class I taught noticed the column-in-a-column appearance of the free-form pinstripe, despite being allowed to handle the original sample and look at the outside, and despite knowing that something was up with the fabric.  Naturally, once they could look at the inside, and once the matter was brought to their attention, it was head-slappingly obvious.  However, if eight out of ten knitters did not notice until it was pointed out, I believe you may rest easy.

Naturally, the thicker the original yarn, the less likely this trick is to escape unnoticed, but the photographed sample was knit in worsted weight, the freeform pinstripe-tacking was worked in that same weight and the whole business still slipped unnoticed by some fairly knowledgeable folks.

Super geek note #1: POLYESTER SEWING THREAD:
If you slip stitch using polyester sewing thread instead of yarn, the result is invisible, utterly and truly.

Ordinary black polyester sewing thread used instead of yarn to work a free-form pinstripe where the surface fabric is black (in other words, what is being caught here is long white floats behind a black background).  The thread is invisible on the front--which is why the only photo is of the back!

So, if this is so invisible, why did I not put this as my main method for tacking down long floats?

There are a few reasons slip-stitching with polyester thread is not my first choice.  First, tension is more of an issue with thread than with yarn.  Second, sewing thread is so strong that, over time, it has the potential to cut the yarn fibers, especially on cashmere, merino or other soft fibers. But the main problem is that sewing thread is slippery and hard to slip-stitch with.  It's frustrating to lose the thread-loop and have to start all over again (and again, and again!).  Although you can (somewhat) mitigate the losing-the-loop problem by working with a small latch hook, like a knit picker, the tension problems really arise from trying to control the loop in the first place.  In other words, as truly invisible as this is, it's waaay pickier than working with yarn--and working with yarn is plenty picky already.

But, again, balance against all these disadvantages, the fact that slip stitching long floats in place with sewing thread is utterly invisible (which column-in-a-column yarn freeform pinstripes are not).  As always, it's knitter's choice.

Super geek note #2: The photos and diagrams above show the float running free, then tacked down via a free-form pinstripe.  However, if you find that your floats are a bit loose, you could ladderback the floats and THEN tack them down.  In other words, you don't have to STUART-ized your long floats (slip and park, the release them)  to afterward form a ladderback, you can actually simply ladderback ANY long floats which have enough slack in them (the trick, however, is to knit looooong floats at a perfect tension--which is quite a trick!)

Super geek note #3: You could try running the free-form pinstripe tacking BETWEEN the columns, but I think this is more obvious--it appears as an extra column inserted into the fabric, as you see from the below photo.  But hey--try it and see what YOU think.


...appears as an extra column inserted into the fabric...

Alternative #2 DUPLICATE STITCH
Rather than run a continuous column of free-form pinstripes, you could instead use duplicate stitches to tack the floats, either a) every-row, or b) in bunches. If you do this trick, then, like all duplicate stitching, be sure to duplicate stitch with a dull-pointed needle so you don't pierce the floats or the fabric stitches on the outside, but actually work over the fabric-surface stitches, as well as the floats.

a) Every row
If you work a duplicate stitch every row to fasten down the floats, ask yourself why you aren't freeform pinstripe-tacking instead? Pinstripe-tacking is worked with a running yarn (faster) while sewing (which is what duplicate stitch actually is) is worked with a cut-length (slower). However, perhaps you prefer sewing duplicate stitch to slip-stitching a column with a crochet hook? If so, carry on...  

b) Bunches
If you gather the floats into bunches on the back, you'd only have to duplicate stitch every few rows.  This works best if you only have a very few rows of floats to gather up (two floats? three?)

And think how neat it would be if you actually used the duplicate stitch to not only tack the floats, but as a pretty little highlight-stitch in a completely different color--a dot along a Fair-Isle row, for example, thus killing two birds with one stone. Here's a little sample I knitted for you which merely hints at the possibilities.

Below are two photos which show the front and back of the sample after knitting, but before tying the long floats down with a duplicate stitch.


Below are two photos which show the front and back during the duplicate stitch process.


The obvious downside to duplicate stitching is that you have more ends to work in. In the above sample, I skimmed the yarn from one far-spaced duplicate stitch to the next, exactly for the purpose of reducing the number of ends to work in.  Which leads me to final trick...

Alternative #3: SKIMMING
You could, you know, simply skim down your super-long floats without the duplicate-stitch trick.  For skimming, you thread a sharp sewing needle with a sock yarn in a matching color, then skim though the floats and the fabric back.  This is just like skimming in ends. It doesn't look that great on the back (but it doesn't look worse than the duplicate stitch, either).  In short, skimming in ends is a straightforward way of fastening down super long floats invisibly: much better than leaving super-long floats on the fabric back.

--TK

You have been reading TECHknitting blog on invisible stranding in knitting, part 4: alternatives to STUART--tacking down super-long floats as part of the finishing process.

Friday, November 18, 2016

Long floats in color knitting: modifying STUART ladderback jacquard for rough-use situations

The STUART long-float method, which I recently introduced, showed how to tame long floats in color knitting.  That was followed by a gallery-post--a photo essay showing the STUART method used to knit a long float hat. Today's post extends the STUART theme by showing modifications for making the ladderback tighter, as well as for tacking it onto the fabric-back.

Why would you want to tighten the ladderback, or tack it down? Well, the ladderbacks of a ladderback jacquard are almost like a separate layer of fabric, loosely lining the inside of the garment.  In a hat, this loose arrangement is generally no problem: heads are covered with slippery hair.

However, the situation is quite different where a ladderback item is designed to fit tightly or where it could get caught on a sharp angle or a protrusion--a finger in a child's sweater, the spout of a tea-pot in a tea cosy, for example.  Or--today's example--a hot water bottle cover.


Hot water bottle cover, outside and inside--note the tight ladderbacks

I knit the above sample because hot water bottles are the ultimate in hard-to-dress items. They are made of a grabby, almost sticky rubber; they have two-sharpish edges; they feature a small flange on the bottom--in other words, they feature lots of stuff for floats to get caught on.   Aaaaaand, to make dressing the hot water bottle even harder, I designed this cover with two large snowflake motifs, widely separated--one on the front and one on the back.  This means the floats don't touch down anywhere between the snowflakes, but instead have to go a lo-o-o-ng way, around a 180 degree bend, to get from place to place.   This design features 11 rows of 26-stitch-long floats.   I think that if you can get a knitted cover--featuring super long floats which go around a corner--onto a hot water bottle, you can pretty much be assured these floats can handle anything.

The opening photos shows the cover relaxed, but this one below shows it in action.


even when stretched, the floats do not show through on the front...


...and the floats do not show through on the side-panel, either

I deliberately over-exposed the side-panel photo so you can really see every stitch of every row and column: see for yourself that with STUART, the floats simply do not show through at all, even when the cover is stretched.

But going beyond the invisibility of the floats, you can see that this cover is laying smoothly over the grabby hot water bottle.  STUART by itself would not assure this result: it is the modifications shown in today's post which help this cover to lay as smooth and flat as it does.

Herewith, the two tricks of today's post: 1) anchoring the ladderback with a twist, 2) pinstripe-tacking the long floats into place alongside the catchment column.


* * *

Trick #1: TIGHTEN the LADDERBACK by ANCHORING with a TWIST

This trick assumes that you are at the point in the STUART process where you are getting ready to hook the ladderback up along the back of the fabric.  In this trick, rather than simply catch the second strand loosely under the first--as is normal with STUART,  I instead put a backwards twist into the bottom rung of the ladderback, then drew every subsequent float through, sequentially.  The red circle indicates the back-twisted stitch.


The red circle highlights the twisted anchor stitch at the bottom of the ladderback. This twisted stitch forces the rest of the ladderback into a narrow, tight column. 

Also notice that I used a short float from the row below the ladderback to anchor the initial twist.  Anchoring the column of the ladderback by starting the first float with a twist creates a tight single-column ladder, rather than the loose triangle typical of STUART ladderback construction.

In some situations, a twist-anchored ladderback might be enough in itself to tighten the floats down--perhaps at the left and right edges of a circular-knit sweater.  However, where the float has to actually wrap around a sticky corner, such as in this hot-water bottle cover, the twist-start column is best used in partnership with the next trick--a trick which actually tacks the ladderback, row-by-row, onto the fabric back.


Trick #2: PINSTRIPE-TACKING: use a PINSTRIPE to TACK the LADDERBACK onto the FABRIC BACK

The point of this next trick is to fasten the ladderback, row-by-row, onto the back face of the fabric. In this way, the ladderback is no longer a loose inside layer which can slide around as you put the garment or item off and on.  Instead, the ladderback becomes one with the fabric. This prevents the sliding ladderback from distorting the stitches in the fabric which they would otherwise pull on, every time the ladderback itself was pulled up or down.

The basis of this trick is really quite simple: I used my pinstriping trick to tack the ladderback onto the fabric-back, row-by row.   Here are several photos of the result.


The black chain of stitches represents the running yarn from the pinstripe on the fabric surface.  If you look closely, you will see that I messed up in several places, catching the floats in the wrong order.  No big deal, however. 


This close up shows the details: the black chain stays to the same side of the tight ladderback and never crosses it. Therefore, the ladderback was worked slightly off center

Here's the step-by step:

  • I used the STUART method to slip the floats.  
  • Continuing in the STUART method, when it came to release the catchment column, I released an entire column of the black knitted fabric to the level of the first float. 
  • However, rather than hooking this black fabric up as a knit column, I hooked it up again as a purl column instead, as shown in the pinstriping post.   
  • Next, I hooked the ladderback up--the white floats, I mean--starting with a twist, as shown in the first trick of this post.
  • Then, working from the fabric-front, I worked a black-on-black pinstripe over the purl column.  
    • As I worked each slip stitch of this pinstripe, I carefully peeked to the back with each stitch, and caught the corresponding float behind the running yarn.  
    • In other words: I used the running yarn of the black pinstripe slip-stitch to tack each white float onto the fabric back, working stitch by stitch (row by row).  

The upside of pinstripe-tacking is that you can now knit with floats as long as the Nile: the floats will be at the correct tension AND they will never catch, either.

However, as we know, there is no free lunch in knitting--there are some downsides: first, this is fussy. It would be particularly fussy if you were trying to work inside of a long narrow tube like a sock, because you have to keep peeking from the front to the back of the fabric with every single slip stitch of the pinstripe column.  (Maybe design your socks so the ladderback is on an accessible portion of the garment: the foot on a toe-up sock, or the top of the leg on a top-down knit sock, then work the tricks before you knit the rest of the sock.) Second, you can kind of see the pinstripe if you really look hard: scroll back up to the previous photo of the side-panel close-up, the pinstripe does reveal itself as a (rather  minor) irregularity in the column-tension. Finally, you can also feel the pinstripe--the fabric is double thick at that point because the pinstripe adds a layer over the purl column.

In my analysis, the advantages outweigh the disadvantages. These long floats have been turned into a ladderback securely fasted onto the fabric back on every single row--this ladderback is going nowhere, no matter how roughly it is treated and no matter how long the float is. Long floats can no longer be caught by accident so they distort the fabric.

And speaking of float-length, let me point out that although I tacked the ladderback onto the fabric back only along the "side seam,"  I did actually create more slips and ladderbacks.  Here is a photo of the cover's inside, showing that I ran STUART slipped catchment columns alongside the snowflakes, and between the top and bottom parts, also. If you want to see more what I mean, scroll up to the opening photo and examine the right panel--you'll see three ladderbacks, but only the middle one (the one along the "side seam") is actually tacked down with a pinstripe.


The catchment columns around the giant snowflake motifs (not tacked down) 

* * *

Conclusion: armed with STUART and today's modifications, I believe we may celebrate the downfall of another knitting rule.  STUART (or any ladderback jacquard technique, actually) lets you knit floats as looooooong as you like.  Today's tricks let you adapt ladderback jacquard to rough service items like hot-water-bottle covers, blankets, children's sweaters, and any other item where you thought a long float or a loose ladderback might catch on something.

--TK

Saturday, November 12, 2016

Warning: Politics

For 10 solid years, TECHknitting has always been about pure, straight up knitting. Well, not today. Fair warning: if you want knitting, wait til the next post (which will be more about the STUART method) or read through the archives.  Today, TECHknitting is a personal letter from me to those who voted for Donald Trump.  If you're too young to vote, voted for anyone else, didn't vote, live in a different country, with all due respect, this letter is not for you.

* * *

Our country just elected a hard-headed businessman as the president of the United States, a man who claims great wealth.  Under his guidance, we are now to get rid of health care for those who cannot afford it and we are to slam the door on refugees. The sick, the persecuted are no longer to be offered our help, they are on their own. Our president-elect has repeatedly made this clear.


We, the formerly proud country which led the world by example of how everyone could get along just fine--founded on the idea that a farmer would stand equal to a nobleman; we the country which welcomed and held out our hand to our neighbors and the poor among us--the richest country the world has ever seen ...well ... we are no longer to be a light unto others, no longer a nation of sharers. Your vote declared our tank is dry.

Fine.  OK.  Fine.

You voted for Trump, you knew what he stood for, you agree with this result. So, here's the deal: You voted for a new day, sister, and I'm here to tell you, in my own small way, that you can now live in the world that you voted for. I've been thinking about this since last Tuesday, and I'm not willingly sharing anymore either.  If you voted for Trump then you do wrong to go on using TECHknitting blog.

Who will enforce this? You will!

See, if you believe in your heart that each person among us must find his or her own way with no free help from you, then you know in your heart that you don't need any free help from me.  Those who do not believe in free gifts--do you recognize that I mean you?--should not take them.

Do you feel punched in the stomach by my remarks? Do you feel betrayed? Have my remarks ruined TECHknitting blog for you?

Believe me, I feel punched in the stomach by your vote. You have voted a mean rich man onto the throne of judgment on the poor and the wretched. And if you think it's OK, because sometimes you have to take the bad with the good, and he will be the savior of you or of our country, you know that can't be: no savior ever came dressed in hate.

Yes I closed the comment section, no I don't want to hear it. You allowed yourself to be led astray against your own better judgment, and there is a consequence.  Sadly, this little pinprick from me will be the smallest and the least of it.

* * *

--TK,  who is sick of all this selfishness in the world. Sick of it, just SICK of it.


Saturday, November 5, 2016

Ten years of TECHknitting

Ten years ago today, I read a knitting blog and thought to myself "I could write a blog, too..."


Thanks for reading TECHknitting blog--TK

Tuesday, November 1, 2016

Zippers in knitwear, the no-sewing way, update!

In 2010, I wrote an article in Interweave Knits about installing zippers into knitwear, a new non-sewing way. In 2012, I wrote an illustrated blog post about it.  There's also a video about the method.

This no-sew method involves turning a zipper into a "knitable object" by  using a knit-picker (a tiny latch hook) to basically YANK loops of knitting yarn directly through the zipper tape. These loops are then attached to the front bands of your sweater just like you would attach any other strip of knitting: by 3-needle bind off, or any other method you like. "No-sew zippers" is one of the most popular posts I ever wrote, but today, there is an important update about the method.

In a marvelous new development, Dritz (the notions company) has evidently invented a zipper with a purposely loose-woven zipper tape, so you can pick your stitches up directly through the tape, using an ordinary crochet hook.  The below photos are screen-grabs from the Dritz website--


The Dritz website shows a new loose-woven panel which lets you pick up loops directly through the zipper tape itself.  Since you can do this at the perfect gauge for the adjoining fabric, the zipper ought to lay nice and flat.


With the loops picked up, the zipper has become a "knittable object." You can attach the zipper to the front bands in the same way that you would attach any two pieces of knitting together: three-needle bind off, etc. 

So, if you've ever needed to install a zipper in a sweater, have a look at the linked TECHknitting blog posts above, BUT order one of these new zippers (I found them available on-line) and realize that you can forget all about that business with the knit-picker! Amazing. And even if it turns out that picking up the loops with a knit-picker works better than a crochet hook (just because of the latch feature of the knit-picker) it would still be way easier to work through a loosely-woven tape than a stiffly-woven one.

Just so you know? I get nothing from the sale of these, and don't know anybody at Dritz either.  I simply think this is a marvelous (and newsworthy!) advance over my original method. Why struggle with a stiff tape, when a zipper with a much looser tape is available?

Go add a zipper to something, OK?
--TK

Saturday, October 29, 2016

Yarn organization for color knitting

Used to be, as soon as I'd start any project with more than one color of yarn, the yarns seem magnetized: they'd instantly glom together in a tangled mess.  Over the years, I've tried many methods to avoid tangling between the colors. Below are the tricks I've really come to like--
Click a link above or ... read on for the pros and cons of each

Yarn in plastic bags

Placing the yarns in a plastic bag with the corners cut off works is so clever--I got the idea from Raveler KnitziMitzi back in 2010, thank you KM (and thanks for permission to re-post your idea!)


Yarn in plastic bags...


Pro: 
  • Keeps each ball of yarn neat and organized
  • yarn can stay in bag until next project--keep moths out by folding the cut corner over and using a paperclip or tape to seal the hole shut.
  • Easy to see in use and in storage
  • Inexpensive, brilliant idea
Con:
  • Only works with center feed balls--too hard to unwrap from the outside when encased in a plastic bag
  • The yarns are free to tangle once they leave the bags 
    • (however, the bags are slippery and easy to re-arrange, so untangling is not that big a deal)
  • The bags very lightweight and pulling yarn out is sometimes an annoyingly two-handed procedure. 

Yarn unspoolers (also called yarn lazy susans)

If your yarn tends to bias, then it is really best to unspool the yarn from the outside of the ball.  There are various yarn unspoolers (sometimes called yarn lazy susans) for sale, or you can make one of scraps from this brilliant design shared here with kind permission of Linda S., Eugene, OR.

After Linda gave me one of these years ago in a knitting class I taught, I use it all the time. It works splendidly.  If you are handy, you probably have most of the ingredients around the house already.


Linda S's lazy susan
finished product

Ingredients and tools:
  • variety of drill bits
  • About 6" heavy-duty bendable copper wire
  • pliers
  • wooden spoon handle (or scrap of 1/2" dowel)
  • strip of scrap wood
    • the original is mounted on a scrap of 3/4 inch plywood  11" long x 1.25 inches wide 
  • safety cap--the kind you slip over cut wire-shelf ends
  • dowel 5/16" (or whatever size will fit inside your CD spindle)
  • small screw
  • CD spindle--used for CD storage--look for one with a hollow spindle.  
  • optional: bar of soap, sandpaper, glue (if required)
  • optional: 5" length of conduit or plastic pipe to lengthen the CD spindle (if required)
  • optional: spring clamp vise for mounting lazy susan to work table

Procedure:


    detail of yarn feeder
  • To make the yarn feeder, curl end of wire two times around the handle of a wooden spoon or a fat pen--leave a short length sticking out to the side, as shown
  • Using the pliers, double back the very end of the wire.
  • Over the doubled-back end of the wire, place the safety-cap--spread the wire apart until the safety cap achieves a good pressure-fit when slid on 
  • Prepare base for yarn feed by drilling a small hole for the wire, centered at one end of the wood strip, about 1/2" in from end.
  • Insert the straight end of wire into the hole, it should pressure fit tightly.  If it is somehow too loose, I recommend gorilla glue--follow the package directions, that stuff is amazing. 
  • Prepare base for yarn spinner by inserting the 5/16" dowel into the hollow spindle of the CD holder and make a mark about 1/8" below where the dowel protrudes from the spindle.  Add another mark below this equal in depth to the depth of the scrap wood base.  Cut the dowel at second mark. 
    • Example: depth of spindle  is 3"=
    • add 1/8"=3 1/8"=first mark
    • add depth of base (3/4 inch) = 3 7/8"= second mark--cut at second mark
  • Drill a 5/16th hole centered on the opposite end of the scrap wood from the copper wire, the hole should be about 1/2 inch in from the end.  The only tricky thing about this whole deal is drilling this particular hole as straight as you can!
  • Pressure fit the dowel into the hole. If it doesn't want to go, sand it down slightly, then rub it with a bar of soap. If it's somehow loose, consider gluing it in place. 
  • test fit the CD spindle onto the dowel, it should just about hit the scrap wood.
  • Drill a small guide hole, then screw the small screw into the top of the dowel. The screw should protrude about 1/4" or 3/8 " out the top of the dowel. 
  • Test fit the CD spindle again, it should now spin freely on the screw head.  If it squeaks, rub a bar of soap on the screw head; if it hits the base, raise the screw; if it is too high and wobbly, lower the screw, or substitute a shorter screw.
  • Optional: insert a length of conduit or plastic plumbing pipe over the outside of the spindle if your particular CD spindle is too short to fully pierce through a ball of yarn with part of the spindle protruding. Sand the ends so they won't catch on your yarn.
  • Attach your new yarn lazy susan to your work table with the spring clamp, or fasten it permanently in place if you prefer. 


Illustration not to scale--the scrap
wood is much longer
in real life

If you love this design, credit Linda. If the instructions are messed up, that's on me, so let me know if something's hard to follow here, OK?

Pro:
  • Yarn unspoolers let the yarn wind off the outside of the ball.  This is important for yarns which would knit a biased fabric if center-pulled 
  • Yarn unspoolers make knitting a pleasure--the yarn is firmly clamped in place and doesn't go skittering around, yet unspools easily for knitting. 
  • The yarns are unlikely to tangle
Con:
  • Lazy susans take up more room than many other methods, plus, you cannot store your project in them, like you can with various other knitting organization schemes, so that's even MORE room taken up.
  • Not travel friendly
  • Might be expensive to buy
    • (but you can make a great one out of scraps, per above)
  • Worst of all: the cats LOOOOOVE them! 

Yarn bowls

Creative potters and woodworkers offer "yarn bowls" for sale. Each individual's design has different features--check before you buy.


A typical ceramic yarn bowl

One desirable feature would be a yarn slot for the running yarn to feed through, rather than a hole.  A hole seems like an OK idea, but when you want to put the yarn aside for a while--such as during a carry over on a stripe--you realize you cannot get the yarn out of the bowl without cutting it. A slot makes switching yarn around much easier.

Pro:
  • A ceramic bowl is heavy and stays put, some wooden bowls are heavy, also.
  • The yarn stays clean and protected inside the bowl, and there is often space to fit the project in the bowl, too, when you aren't working on it (that's what the needle holes are for--so you can leave the needles--either circ or straight--poked into the work and still fit the work into the bowl)
  • If you place one ball of yarn per bowl, the yarn is free to jump around in the bowl. This allows an outside feed off the ball, so the yarn comes off with no biasing.
    • (Sometimes, in a larger bowl, two balls fit loosely enough to jump around without tangling, especially if there are two yarn slots)
Con:
  • A lighter-weight bowl, such as plastic or tupperware tends to skitter around
    • (however, you can stabilize a lightweight bowl by placing a heavy weight in the bottom--rolls of pennies work well) 
  • A heavier weight bowl tends to be fragile, especially in ceramic
  • Good quality yarn bowls are usually expensive 
  • Yarn bowls are bulky, and if you need one per color, they start to take up serious space 
  • Yarn bowls are not travel friendly

Collapsible wire-and-mesh basket / binder clip yarn guides


IKEA Noje
IKEA had some small pop-up baskets for sale a few years ago: they were called NOJE, came 3 to a package: white with orange, or green or blue binding at the top.  They are sort of like mini-laundry hampers, about 8 inches tall and 9 inches across.  I stockpiled dozens and have never regretted the purchase.  They smash flat for getting multiple projects into one suitcase, then pop up again when you get where you're going.  They are deep enough to allow two balls of yarn to jump around freely when pulled--good for yarns which might bias and therefore need to be unspooled from the outside.

NOJE baskets don't have a yarn guide like a yarn bowl or a lazy susan, but you can easily rig up yarn guides out of binder clips.  Binder clip handles come off and go back on again if you'll simply flip the handles up, then squeeze the two sides of any one handle together towards one another.  Because the yarn goes through these removeable handles, the yarn can be taken in and out of the guides without cutting.  When it's time to put the project-basket into the suitcase, you flip the binder clip handles down, out of the way.  When its time to knit, flip the handles back up again.

 Naturally, it will occur to you that binder clips aren't restricted to use on-pop up baskets: you can attach them to an ordinary ceramic bowl, any kind of basket, etc., thus adding yarn guides where ever you like.


Noje pop up baskets + binder clips--
the magnifying glass to left offers a close up
of binder clips in action

You can put the cable of your circular knitting needle under the binder clip also.  However, the baskets don't work very well with straight needles.

Pro:
  • Pop-up baskets are to pack, easy to use, and keep projects separated: perfect for traveling with (or storing!!) multiple projects in a suitcase. 
  • Baskets accommodate surprisingly large projects as well as surprising amounts of yarn, yet pack down into a surprisingly small space
  • Binder clip yarn guides work great with pop-up baskets, but they will attach to many other surfaces also, thus adapting all sort of containers to be knitting baskets/bowls. 
Con:
  • Pop-up baskets are light weight, skitter around in use
    • (however, you can put a weight in these when you get to your destination)
  • IKEA no longer sells these
    • (maybe you can find a different manufacturer?)
    • (By the way--if anyone *really wants to try these* I have enough, still in the package, to sell if you really want 'em. Contacting me is easiest through Ravelry)
  • Baskets do not accomodate straight needles very well--the points want to poke right through the cloth. 

Command hooks

Lastly, a method that works well wherever you are, whether in your favorite knitting nook at home or on vacation in a hotel room.  With this trick you harness the amazing power of command brand hooks to hang your balls of yarn in any order you like, on pretty much any surface you like.

Command hooks feature a removeable two-sided sticky backing.  One side sticks to the hook, the other side sticks to the wall, the instructions come in the package.  The backing comes off very easily by s-t-r-e-t-c-h-i-n-g the backing downwards  ...  BUT!!! pull SLOWLY or it will tear.  When properly removed, a command hook leaves no mark  on any surface, whether wall, table edge/bottom, or even an airplane or tour bus seat back.

When command hooks first came out, they cost the earth, but the price has come down substantially.  Also, you can use the same hooks over and over again.  The replaceable part are the sticky strips, but nowadays you can get boxes of 20 replacement sticky strips for under $3.00 if you hunt around on the web. (Prices vary WILDLY for this product, so keep hunting!)

In my experience, the best ones are the small size with the wire hook illustrated below. This style also works stuck under a table because the wire hook dangles freely from the plastic backer.    

In my knitting nook at home, I have two stuck UNDER my work table and three stuck to the edge of my work table, so I can hang up to 5 different balls of yarn right next to one another, exactly where I am working. Even with the most complex patterns, I've never used all the hooks at the same time.


command hooks in action--view from under the table

I take a pocket full of hooks and strips with me on my travels, too.   And you know, you can combine KnitziMitzi's bag-trick with the hook-trick: hang the bags ON the hooks and you really are good to knit in pretty much any situation anywhere.

Pro:
  • There is very little tangling with command hooks because the balls remain in one place and the running yarns do not easily cross 
  • Command hooks up the least room of any system, and they the most adaptable--there is always some surface you can stick these to!
  • Easy to rearrange the order of the yarn, easy to add and remove yarns from the lineup
  • Adaptable: command hooks go up and take down in minutes but can also be used in a permanent situation, such as the knitting nook work station illustrated above.
  • As for storage: you can hang smallish WIP over one or two of the hooks, just make sure you catch either the barrel of a straight needle, or the cable on a pair of circs.
Con:
  • Initially expensive-ish
  • Only works with center pull balls--do not use with yarns which tend to bias
  • small hooks are only rated to 1/2 lb. 
    • (despite this weight limitation, I have, on occassion, hung several balls of yarn from them in a project bag and there has never been a problem. Yet, your experience may differ)
  • The package indicates the sticky backer should be allowed to sit for some time with no load before use 
    • (I always use them right away but, again, your experience may differ )
Do you have any neat ideas for organizing color-knitting yarn to make it easier to knit multiple colors at a time?  

--TK