Friday, December 30, 2011

Sharps and flats: sewing needles, part 2

Way back in May 2007, TECHknitting had a post on the two types of sewing needles: blunt pointed and sharp pointed.  The point (ha!) was that each kind has a different use.  Blunt points are best for such tasks as weaving, where you don't want to split the plies of the underlying yarn. Sharp points work well for splitting plies, good for such jobs as skimming in ends.

Although each type is good at what it does, the truth is that it can get rather tiresome having to switch back and forth, for example: first threading to a blunt point for weaving in an end, then rethreading to a sharp point to skim in the last nub of the tail.  The temptation is to skimp and just muddle through with whatever kind of needle comes to hand first.

Recently, Patti from Canada was reviewing this old post.  In response, she sent her own little trick to avoid needle switching.  Her e-mail reads as follows:

If you need to use both kinds of needles, 
it is easiest to thread onto a sharp needle, and 
> then just push it wrong way around
(eye first instead of point first) 
in those places you need the blunt point.
> Just be careful not to stab yourself.

What a swell idea!  No more muddling, no more skimping!

Weaving with a sharp needle held wrong way around

Close up

No need to rethread onto a sharp point
when the time comes for skimming in


Using a sharp needle backwards: really very clever! (And I will try not to stab myself.)  Thanks, Patti.

--TK

Thursday, December 29, 2011

Pattern beta/test knitters

Dear readers: you are amazing.  Wow.  There have already been more responses than I can keep up with--so thank you very much. I'll leave this up for reference, but with the text crossed out. Hopefully, the pattern will soon be available, if the test knits work out.

Thanks again, and happy, happy new year. TK

ADDENDUM Feb 2012: The pattern has been test knit and is now available.

Lately, more patterns have been generated here at chezTECH.  The latest of these is a ladies' cap called "Spice Road."  It's a pretty neat pattern: it's knit flat in stockinette, all in one piece, utilizing a lot of short rows. Then, the fabric is folded, welted, seamed.


I named it that after the fabled spice road of old, because it has three design features found in central Asian headgear: a wide smooth expanse over the brow, a little brim which runs around the top, and a turban-like fold in the back.


One problem is making sure TECHknitting patterns are correct. Lately, I've been doing all the test knitting myself.  Yet, this is not a great idea. Because I know how the item ought to come out, I'm afraid I'd gloss over any error in the pattern.  Spice Road is, I think, ready for release, but I wonder if any my lovely TECHknitting readers out there would consider test knitting it first? The pattern is designed for intermediate knitters and above (but a bold advanced beginner could probably manage).


Here's the deal:  It would be great to have a three (or so) test knits. So, to those volunteers, I'll send the pattern as a PDF.  You buy the yarn or use up stash, and knit the cap by January 31, 2012.  Once you've gotten back to me with your comments, and once the cap is posted as a project on your Ravelry page, I will send you a $25.00 honorarium.  This will hopefully cover your yarn cost.


$25.00 for test knitting isn't a lot, and in an ideal world, it would be more, for sure.  However, in this non-ideal world, any money from the sale of the Spice Road cap pattern over and above the honoraria is instead slated to go towards snowpants, socks, boots and science club funds, all of which the local schools around here are finding in precious short supply.


Tech details:  a single 100 gram skein of worsted weight yarn will suffice. Common yarns in this weight include Cascade 220, Wool of the Andes, Northampton Valley Yarn, Pattons Classic wool, and the like.  The cap would best be made in wool--synthetics, especially "soft" synthetics,  may not have the body required for the details of this cap to work out. The gauge is 5 st/in, 7 rows/in, pretty standard for this weight of yarn. A circular needle 22" or longer is required for knitting stockinette back and forth at the required gauge (there are possibly too many sts on the needle at one time for a single-pointed needle to work). A 16" circular needle a size smaller is also required, as is a crochet hook of size proportional to the yarn. A steam iron will be handy for blocking.


Bottom line: if you are an intermediate knitter or above, if you are interested in being a test knitter for Spice Road ladies' cap, and if you can can afford to do so under these terms, write to me at the e-mail address under "profile," at the top of the right side bar. We'll work out the details to our mutual satisfaction, and then I'll send you the PDF pattern. And for everyone else, if the test knits work out, the pattern for the Spice Road cap will be for sale: this winter, hopefully.


Thanks for your consideration,
Best, TK

Tuesday, December 27, 2011

Three needle bind off (for real, this time)

A reader wrote to ask about the three needle bind-off.  (For the first TECHknitting 3-needle post published, I skipped a brain gear and got the illustrations actually backwards.  In this post, the error has--hopefully, anyhow--been eliminated.)

The three needle bind-off is a variant of the chain bind off  but with two major differences:
  1. instead of drawing the running yarn through the one live stitch, you instead hold two pieces of fabric together and draw the running yarn through two live stitches: one from each fabric. 
  2. working in this manner not only binds off both fabrics, but also connects them, thus creating a seam. 
Here's how it's done:

Each fabric is worked to the very top, then held with the live loops of the last row on its own needle.  Next, the fabrics are held together, front-to-front.  This orientation puts the seam you are creating on the inside of the garment.

In the below illustration, both fabrics to be connected are knit in stockinette, and the knit side of the fabric is meant to be seen when the garment is worn.  Accordingly, both fabrics are being held with their purl sides facing outwards, which means that their knit sides are rubbing against one another as the fabrics are being held front-to-front.

From the position of the knitter doing the seaming, the red fabric held in front shows its purl side, while the green fabric held behind shows the knit face--its purl face is showing outside on the back of the work. When the seam is finished, the fabric will be flipped open so that both knit sides show while the purl sides (and the seam) will be hidden inside the garment.


This trick is called the "three needle bind off" because, besides the two needles acting as holders for the live loops at the top of each fabric, a third needle does the actual work, as shown below.  Specifically, the third needle (silver) is inserted into BOTH first loops of the two fabrics.  You can see that the insertion is from front to back in the same way you'd insert if you were going to knit the next stitch.  The yarn doing the actual bind off--shown in blue--can be either a scrap of loose yarn, or the tail from one of the fabrics being seamed and bound off.


Using the third needle, the blue yarn is knit through both first loops, and both first loops just knit are dropped off.  Next, the third needle is again inserted into two loops, another stitch is knit with the blue yarn, and again, the two loops just knit are dropped off.  The below illustration shows two blue loops drawn through, as they rest on the working (right) needle, waiting for the bind off step. As you see, the blue loops pass through the top loops of both the red and the green fabric. 


The last step is to pass the first blue loop over the second.  This is done exactly as for the chain bind off discussed earlier.  Note that at any point in the process, there will always either be two loops on the right needle, which happens when the first loop is waiting to be drawn over the second, or there will be one loop on the right needle when, as below, the first loop has already been drawn over the second.


For a final illustration, here is an actual photo of a partially finished three-needle bind off, "in the wool."  The two shiny holder needles are being held upright, out of the way. The third--the grey working needle--has already been poked through the front (red) as well as the back (green) fabric, getting ready to catch up the next blue loop. Showing to the right is the blue chain of the seam being formed as the fabric-tops are chain bound off together.


To work the seam to completion, you would repeatedly work the insertion, the drawing up and the passing over, all the way to the end of the holder needles.  At the last stitch, cut the blue yarn, leaving a tail at least several inches long.  Draw this tail through the last loops as is done for chain bind off (scroll to the bottom of the chain bind off post for several different methods).  Then work in the tail.

Three needle bind off is often recommended for shoulder seams, but it can be used anywhere that two lines of live loops come together and require a sturdy seam to connect them.


One last thing:  usually, an equal number of stitches will be on each of the two holder needles when working a three needle bind off.  Sometimes, however, you wind up with an uneven number, either by accident or design.  In such a case, you have two choices:
  1. either work three stitches off together with the working needle and the running yarn, which is a trick to even up the numbers of stitches while seaming
  2. get rid of an extra stitch of by passing it over a neighboring stitch while the stitches are still on the holder needle.  With this second option, you are reducing the count so that equal numbers of stitches will be on both needles before seaming. 

Good knitting--TK

You have been reading TECHknitting blog on 3 needle bind off

Sunday, December 25, 2011

Author error--three needle bind off

TECHknitting blog published a post on three needle bind off.  Unfortunately, I skipped a brain gear and wrote the directions BACKWARDS which I did not realize until an alert reader commented.

If you read the original post, please erase your memory banks and go to this corrected post, instead.

With apologies, TK

Friday, December 16, 2011

Dear Club Osinka/Уважаемый клуб Осинка

Please stop pirating my illustrations. It takes a long time to draw each one, each is copyrighted, and it is disheartening to see them ripped off.  If you want to supply a Russian translation, feel free, but link back to the original illustrations, instead of pasting them into your own document. (And if you ARE going to pirate the illustrations, at least put them in the right order with the correct instructions.  Sheesh.)

Пожалуйста, прекратите воровство моего иллюстраций.
Нарисовать каждую из них занимает много времени, они все
защищены авторским правом, и мне грустно видеть их
украденными. Если вы захотите перевести надписи на
иллюстрациях, пожалуйста, я не против. Однако вы должны
добавить ссылки на оригинальные изображения, а не просто
вставить мои картинки в свой собственный текст.


--TECHknitter

Wednesday, December 7, 2011

Increasing in seed stitch (and decreasing in seed stitch, too!)

Seed stitch (sometimes called moss stitch) is a stitch pattern which arranges knits and purls checkerboard-fashion so that every purl is surrounded by 4 knits, and every knit by 4 purls.

seed stitch arranges knits and purls checkerboard-fashion

Increasing and decreasing in a very regular stitch pattern like this is disruptive, and several recent e-mails to TECHknitting blog have asked how to do this smoothly.

No doubt there are several different methods, but my own little trick is to run a single column of knits, and increase or decrease along that line.  Stated otherwise, pushing the stitch pattern discontinuity up against a continuous column of knit stitches smooths and hides the irregularity.

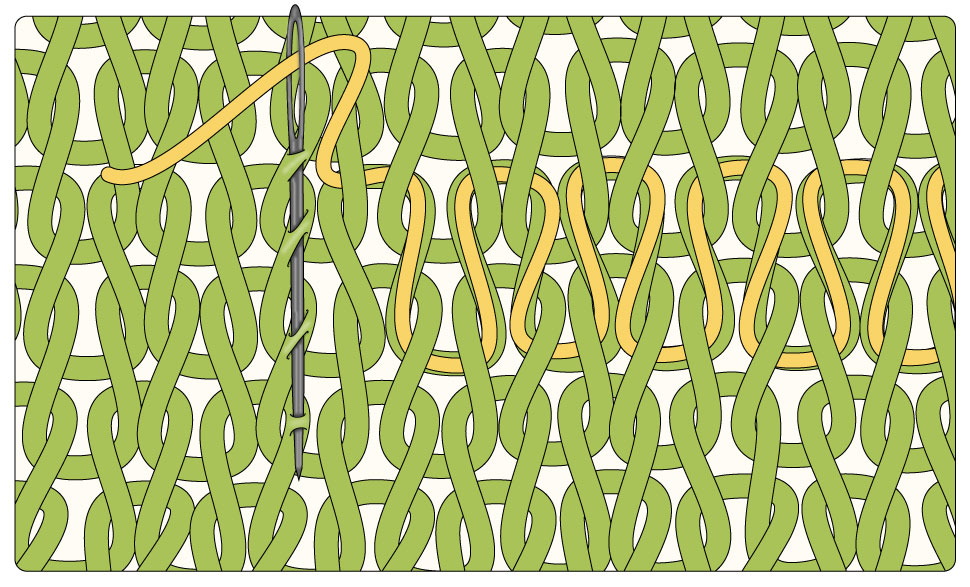
Increasing seed stitch in circular knitting
Here is a schematic of what this would look like when knitting circularly, with the increase running along a single increase line, as it might be for a sleeve knit in the round.

circular knit seed stitch: increasing
along the center line, schematic

In the above schematic, the work is laid flat so you can see it, but in the real world, this sleeve will have been knit into a continuous spiral--a cone-shape, open at the bottom.  You have to use your imagination to "zip it shut" into a circle, along the red dotted lines.  In other words, for a circularly-knit sleeve, you would actually have knit this around and around, connected at the dotted lines.  The continuous column of knits running down the schematic center is actually the sleeve underarm "seam."

Below is a photo of what an increase along a center line for an underarm looks like "in the wool."

circular knit seed stitch: increasing
along the center line, "in the wool"

How to make the increases
The little red loops stand for the increases, and you can use any kind of increases you like. I personally use backwards loops slanting in different directions, as detailed here, but many kinds of increases will give a perfectly lovely result, such as kfb (knit front and back) or the nearly invisible increase.  Using a yo (yarn over) will result in holes, however, so yo's are not a great choice.

This all sounds very simple, and ultimately it is, but a lot of confusion typically surrounds increasing in pattern, so let's run through increasing one more time, in more detail, OK?

The surprising fact is that when you come to make the increases, you can just make whatever kinds of increases you prefer, not worrying about whether the stitch to which the increase gives rise is ultimately going to be a knit or a purl.  That's right--when you make the increases, you just make them however you like. Only on the FOLLOWING row do you have to worry about working that increased stitch as a knit or a purl, according to the checkerboard pattern established by the surrounding stitches.

Stated otherwise, a loop added to the fabric in the form of an added stitch does not take on the character of a knit or a purl until it is worked on the FOLLOWING row.  (If you are curious why this should be, a fuller explanation about this particular mystery of knitting is found in this post.) So the bottom line is, just make a pair of increases, and on the row or round after the increase, then work those new stitches as whatever they ought to be (whether knit or purl) as required to keep the checkerboard pattern going.

Increasing seed stitch in flat (back-and-forth) knitting
So far, we've shown the trick of increasing along a center line, such as would occur in circular knitting of a sleeve.  However, many patterns call for seed stitch to be worked flat (back-and-forth).  Here is what the trick looks like when knitting flat (back-and-forth) and the increase is along the outer edges, instead of down the middle.

flat knit seed stitch: increasing
along the edges, schematic

Above is the schematic, and below is the final result "in the wool." The seam (red dotted lines) has not yet been sewn shut, and the sleeve is laying flat.

flat knit seed stitch: increasing
along the edges, "in the wool"

Rate of increase
In both situations illustrated in this post, I tried to cram lots of increases into a small sample, so the increases are worked every fourth row.  However, an increase every 6th or 8th row might be more common for a sleeve, for example.  Nevertheless, although the RATE may differ, the METHOD remains the same.  Just work your increases on either side of a center line (if working circular) or one stitch in from the edge line (if working back-and-forth), at the rate required.  Then, on the NEXT row, worry about whether the increased stitch should be worked as a knit or a purl, according to the seed stitch pattern established by the surrounding stitches.

Variation--more than one knit column separating increases
I have chosen to have a single center column of knits, or a single column of knits along the fabric edge.  There is nothing to stop you from running two or three or more columns of knits, instead.  In fact, for a situation where there will be seaming, remember that the edge stitches might be completely consumed in the seaming process, so an extra knit column along each outer edge might come in very handy. Consider all this ahead of time, and adjust the stitch count, if necessary, so as to allow for the all-knit column(s) as well as to provide an odd or even number of stitches, as circumstances dictate, so that the stitch pattern is uninterrupted.


DEcreasing in seed stitch
All of the above relates to INCREASING in seed stitch, as might occur in a sleeve started at the bottom increasing from wrist diameter to shoulder diameter.  Sometimes, however, you might be working the other way around, such as a sleeve started at the shoulder, and required to DECREASE to the wrist diameter as the sleeve is worked.

Luckily, DEcreasing in seed stitch is exactly the same theory, except that you simply work two stitches TOGETHER at the required rate, rather than form an increase. It is a nice touch to employ symmetrical decreases such as the right leaning k2tog and the left leaning SSK (or the left-leaning SYTK).

Once the excess stitch has been removed on either side of the center line, or on either edge of the row, continue to work the remaining stitches in checkerboard pattern as required by the surrounding stitches. Stated otherwise, the LOCATION of the decreases is the same as the location of the increases: if working circularly, one on either side of a center line of knits; if working back and forth, one decrease on each end of the indicated decrease row, one stitch in from the knit column(s) along each edge.

Does this look familiar?
When you get right down to it, this trick of shaping on either side of a column of knits is really just an adaptation of a method widely used in circular-knit raglan sweaters: if you have ever knit a raglan sweater in the round, this is the shaping which is done on either side of the 4 raglan seams, keeping the center column(s) in all-knits.  The difference here is that the shaping (increasing or decreasing) is done in pattern of seed stitch, instead of stockinette, and the column of knits is used to disguise the stitch pattern discontinuity resulting from shaping.

--TK
You have been reading TECHknitting blog on increasing in seed stitch, and decreasing in seed stitch, too!